skip to main |
skip to sidebar

Before I leave the house to see in the new year, wearing naught but a smile and a set of bagpipes, I want to wish you all the very best for the new year. It's going to be an interesting one for me - I've handed in my notice at work to pursue a career in food. More on that at some later date; just to say for now that I've finally realised that there's no such thing as 'the right time' to do something, and that I'm not getting any younger...
Enough homilies. Make sure you have lots of fun tonight, get rowdy, kiss someone...
Again, all the very best for 2008.
 Free Rice is a food-linked word game. How to play? A word is offered and your job is to select the right definition for it from a list. If you get it right, the next word offered is harder; if you get it wrong, an easier word is offered. Each correct answer generates 10 grains of rice for distribution by the United Nations World Food Program.
Free Rice has two goals:
Free Rice is a food-linked word game. How to play? A word is offered and your job is to select the right definition for it from a list. If you get it right, the next word offered is harder; if you get it wrong, an easier word is offered. Each correct answer generates 10 grains of rice for distribution by the United Nations World Food Program.
Free Rice has two goals:
- Provide English vocabulary to everyone for free
- Help end world hunger by providing rice to hungry people for free
The rice is paid for by advertising on this incredibly popular site, run by One World Projects.
Clicky to play.

It's been four weeks since I started the limoncello. The liquid smells very lemony and the smell of the alcohol made my nose wrinkle. The peel should be completely colourless, so it's now time to separate it from the alcohol. Once done, we'll be adding the sugar syrup.
Firstly, find a container large enough to hold the alcohol, as well as the sugar syrup you'll be adding later - it needs to be about a litre or so in size. Moisten a paper coffee filter with water (to stop it from absorbing the lemon oils and alcohol) and place inside a funnel. Pop the funnel in your container and then gradually add your alcohol - allow this to drip through and hopefully you'll have a nice, clean liquid. When you finally get to the peel, squeeze the filter (gently) to get as much of that lemon oil out as you can.

Make your sugar syrup by combining a cup of sugar and a cup of water in a pot. Bring to the boil and simmer for a couple of minutes; remove from the heat and allow to cool. As you add the syrup to the alcohol, give it a stir and sample it - add more or less syrup according to taste. Finally, pour into your bottle, seal and then place in a cool, dark spot to infuse.
It's drinkable after a week or so but clearly the longer you leave it, the better it will taste. Enjoy!
Whoops - for those who didn't already know, chill it before drinking. It's also a sipper, not a quaffer...


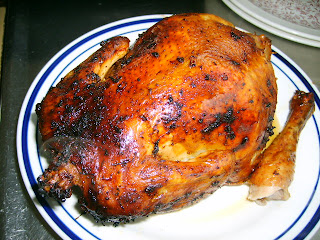
Hello! Just a quickie post today - I made beer can chicken on the barbecue for dinner and thought I may as well grab the camera and show you how it went. It's super easy to do (this is the first time I've ever made it), with the most splendidly juicy outcome!
All you need is an uncooked chicken, a can of beer and an oven or barbecue to cook it in/on. I also made a rub for the chicken:
- 2 teaspoons of coriander seeds
- 2 garlic cloves
- 2 teaspoons paprika
- zest of 2 limes
- juice of 2 limes
- salt
Roughly grind the seeds with a mortar and pestle. Add garlic and zest; grind until you have a rough paste. Add juice, paprika and a smattering of salt, mix well and apply to the chicken. I used this particular rub because I thought it would go well with my choice of beer, Monteith's Radler, a zesty lemon and lime flavoured lager. Seeing as it only comes in bottles, I poured it into another can I happened to have handy.
On to the chicken: remove the giblets, rinse the chicken inside and out and dry with a paper towel. Apply some of the rub to the interior and the remainder on the outside - use your hands, rub vigorously. Now, you'll only need half a can of beer for cooking purposes, so discard the portion you won't need down the nearest throat. Once that's done, punch another two holes in the top of the can.
Now for the tricky part: holding the chicken upright, lower it onto the beer can so the can fits into the cavity (see photo above). The chicken's legs should be leaning forward with the brunt of its weight supported by the can.
This is best cooked on a barbecue with a hood; failing that, your oven will work just as well. If you're using gas, turn the heat on full while you're prepping, and turn down to medium or medium/low when placing the chicken on to cook. Place the chicken on a dish (this will collect the juices, otherwise they'll run off and onto the flame causing flareups). Pop it on the heated barbecue plate, away from direct heat and leave to cook with the hood down for 1 1/4 to 1 1/2 hours. Test the meat with a thermometer poked in the thickest part of the chicken - it needs to be 85 degrees celsius to be cooked. You can also jab it with a fork - if the juices run clear, it's ready.
Once done, grab some oven gloves and remove from the heat. Using tongs, carefully remove the can from the chicken - bear in mind everything will be very hot and the can will still have some (hot) beer in it. Once done, leave the chicken to rest for ten minutes before carving.
There are German businessmen who'd pay good money to have this done to them...
 And there we have it! A wonderfully crisp, juicy and aromatic chicken. It really was quite simple to do and was very tasty - give it a whirl!
 There are concerns about subjecting aluminium cans to heat due to possible toxicity arising from the can's plastic lining, metals and paints. According to this article, the risks are negligible, due to the relatively low heat involved in the cooking process, compared to that of its manufacture clickety.
The following link discusses beers worth experimenting with when making beer can chicken - the article is American, but their core advice is sound clickety.
- DIY candy floss machine (Instructables) Clickety
- Are you an arcade gamer? Enjoy a drink? (Boing Boing) Clickety
- Interested in offal? Check out Offal Good Clickety
- Pancakes in a can (USA, bless...) Clickety
- For hire: truffle hunter (Smithstonian Magazine) Clickety
- Super simple popcorn maker (video clip) Clickety
- Ancient beer pots point to origins of chocolate (New Scientist) Clickety
- Get 20 free drinks using 20 different bar tricks Clickety
 Nothing beats the sweet, smoky odour of food prepared on a smoker. While many New Zealanders own small smokers which hot smoke food, backyard cold smoking isn't nearly as widespread an activity. This is a shame as cold smoking allows greater control over the flavour of food being smoked. It can be time consuming but as is often the case, the end result makes it well worth while.
Cold smoking is the process of using smoke to cure and flavour foods without cooking them. In the past, this was done as a means of preserving fish and game for consumption during the leaner, less bountiful times of the year. The temperature range is between 12 to 25 degrees celsius, or room temperature, and the smoking time can take anywhere from a few hours to several days. To eliminate the risk of spoilage, the food can be cured, in the form of salting or brining, prior to smoking. Large setups allow for the smoking of chicken and game birds, fish and large cuts of meat. Cold smoking is ideal too, for flavouring small produce such as cheese, olives and salt.
To achieve the necessary low temperatures, the fire needs to be kept separate from the food being smoked. This is achieved by drawing the smoke from the heat source to the smoking chamber through piping or tubing, as seen in the technical diagram below.
 With ideas cribbed from various books and websites, and with the help and expertise of Chocky, friend and backyard engineer, I set out to make my own mini cold smoker. Basically, it comprises two large stockpots; one sitting on an electric hotplate, connected to the other pot by a length of duct pipe. With the hotplate on, smoke from the smouldering sawdust is drawn into the other pot through a little battery-powered computer fan, with the heat dissipating as it makes its way across the divide - simple as that!
I was going to need:
- 2 x 9 litre stockpots (mine were cheapies from the big red shed, a tenner apiece)
- Duct pipe, 3 metres long, 100mm circumference (found at any hardware store; mine cost $25)
- Computer fan (whipped from an old computer case; 12 volt)
- Empty can, 100mm circumference (or as close as you can); also, it needs to be large enough to hold the fan (the fan was a tad bigger than the can, but you'll see what I did to get around that)
- Electric hotplate
- Grinder, jigsaw, drill, rasp and other assorted tools
- 12 volt battery (a car battery)
- Cable ties (pipe clips would be good but I couldn't find any for the duct pipe in a 100mm size)
- Wire, to extend those already on the fan, about 1 metre in length
- Clips, for the wire so it can connect to the battery
- 2 wooden drawer handles
On to business: I drew an outline of the can on the bottom of one of the stockpots with a marker. I drilled a little hole for the jigsaw and began to cut my circle. When you're finished, use a rasp to file off any jagged edges and then wash the pot to remove filings and dust. This pot is our smoking chamber.
The empty can will stick out of the hole in the bottom of the pot - this is what the duct pipe will be attached to.

Chocky built a stand to hold the smoking chamber, using scraps lying around the workshop. We have a tripod, about a metre high with a supporting platform. The hole is to accomodate the can poking out of the smoking chamber.

Slits are cut in the top of the empty can and then flared to stop it from slipping through the hole in the bottom of the smoking chamber. It's hard to make out in the photo but the can holds the computer fan. It initially wouldn't fit, so I ground down the corners with my grinder. Don't take too much off; you want it to be absolutely snug inside the can. The fan will draw the smoke up through the duct pipe from the pot on the hotplate.

Place the smoking chamber over the hole in the platform. Pop the can into the hole in the smoking chamber, which in turn should be sitting over the hole in the platform. I was going to rivet the can to the pot, but I wanted to make the unit portable and easy to disassemble.

The fan's wires come out of the top of the can and lead out through a hole I drilled through the bottom of the pot.

With the smoking chamber sitting on the platform, add your extra length of wire and then the clips for the battery.

Take one end of the duct pipe and attach to the can with your cable tie or clip.

Now for the other pot - this will hold the sawdust and sits on the hotplate. Cut a hole in the pot lid for the other end of the duct pipe. Make it slightly smaller than the diameter of the pipe - it will make for a snug and secure fit. File any rough edges, rinse the lid in water to get rid of dust and filings, then slowly twist the pipe into the hole. Now screw the two wooden drawer handles into the lid; wood is a poor conductor of heat, so no burnt fingers for you when it comes to removing the lid to add more sawdust.
As mentioned before, the smoke in this pot is generated by the smouldering sawdust, heated by the hotplate. As the heat rises, it carries the smoke up through the pipe. With three metres of pipe to traverse, the heat quickly dissipates so by the time it reaches the smoking chamber, the smoke is at room temperature.

Voila! One gleaming cold smoker, ready for action.

All I need now is to install some circular racks inside the smoking chamber to hold the food - a visit to some second hand stores and a garage sale or two should turn something up - old barbecue racks or similar should do the trick. Once that's done, it'll be time to give it a whirl - I'm thinking about re-visiting my previous bacon experiment and later, I'll smoke some peppers to make my own smoked paprika. I'll keep you posted...
A big, sabre-rattling "huzzah!" to Chocky for all his help (he practically built it all) - cheers, son!