skip to main |
skip to sidebar
- High tech kitchen appliances (the gallery's fantastic! PopSci) Link
- Japanese bread-in-a-can (BB Gadgets) Link
- Salt early and often Link
- Vintage wine fraud (The New Yorker) Link
- How to build a kegerator Link
- Jamie Oliver Survival Kit Link
- Have you got an iPod Shuffle? Do you drink beer? Do you use keys? You need this Link
- Delight or abomination: you decide Link
- Lego cake (BB Gadgets) Link
- How to salt water (check the reviews!) Link
- US state and county fair foods (slideshow) Link
 Warning: there are some graphic photos in this post.
You needn’t starve working on an orchard. Leaving aside the veritable fruit salad growing on the trees, the orchard serves as home to all manner of edible flora and fauna: wild blackberries, mushrooms, puha, watercress; eel, duck, peacock (use the feathers to enhance the appearance of a hat!), sheep (make sure they’re yours), cattle (they have to be on your side of the fence), hare and rabbit.
Rabbit is an under-appreciated meat in this country. It is, unfortunately, abundant and easily accessible. Rabbit cooks well and lends itself to rich, bold sauces. Young rabbit isn’t particularly strong in flavour, almost resembling factory-reared chicken; older rabbit is much more flavoursome while not being overly gamey.

With spring having sprung, rabbits are plentiful. The beasts are also looking rather plump too, and not having eaten rabbit in a long time, it seemed the perfect opportunity to reacquaint myself with the taste.
Kerry, being the resident hunter and firearms expert, agreed to take me out hunting. Armed with a .22 rifle, it was into the station wagon - being nice and low, it made it easy to spot rabbits under the apple trees (stealth however was sacrificed for comfort). We set off, two men engaged in the age-old struggle of man versus small cute furry beast.

We saw a lot of hares but no rabbits. Night would have been a more ideal time for hunting as they are nocturnal (er, rabbits are actually crepuscular - most active around dusk and dawn) but I wanted photos. Two hours later, Kerry bagged a couple and it was back to the house for skinning. This is best done outside as the smell can be quite musky.

Removing the pelt is relatively easy. With the rabbit lying on a flat surface, pinch the skin on its underside and carefully insert your blade there, cutting to create a slit. Put the knife aside and insert your fingers, separating the skin from the rabbit. Go all the way around the rabbit (see below). Now tear or cut the skin so it is separate from the head.

Grasping the loosened edges of skin, pull down until the front legs are free.

Continue pulling down until the back legs are free.

To remove the organs and digestive tract, carefully insert the knife at the base of the stomach and slowly move the blade up until you reach the sternum, being careful not to cut the intestines. Pull apart the covering and remove the contents starting from the top and working your way down to where you started with the blade.

Examine the organs for anything unusual, such as lumps, bumps, odd-looking growths or cysts - discard the rabbit if you find any. Carefully pull the lower intestine through the anus and discard the guts in a secure rubbish bin - failure to do so may result in your neighborhood pets spreading their stinky goodness around your yard. Composting them may be an option but I'm not sure how - ask around or take a look online.
Cut off the head and the lower joint of all four legs. To remove the tail, cut a V at the point where the tail connects with the body.
 Now check the body for cysts or lumps and again discard the animal if you come across anything unusual. Give the rabbit a quick rinse under running water, then cut into sections. Place in a sealable bag and leave in your fridge to settle for a few days.

Voila! Fresh rabbit, prepped for cooking.
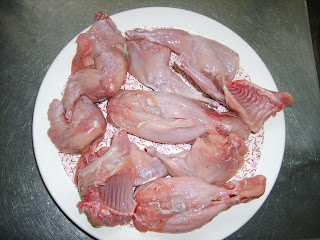
After going to all this effort, I wanted to do something rather fancy. After digging through my library, I found this recipe in an old English game cookbook. Butter, eggs, cream, brandy... Ignoring the sudden crushing sensation in my chest, it was off to the kitchen.
Rabbit in Mustard Sauce
2 rabbits (about 2 1/2 pounds each), cut up
Salt
About 1/3 cup all-purpose flour
1/2 cup butter
3 tablespoons brandy, warmed
1/2 cup thinly sliced green onions
1/4 cup minced parsley
1 pound small whole mushrooms; or large mushrooms quartered
2 tablespoons Dijon mustard
2 cups whipping cream
2 tablespoons lemon juice
3 egg yolks, lightly beaten
Chopped parsley
Rinse rabbit and pat dry. Sprinkle rabbit pieces with salt, then dust with flour. Melt 5 to 6 tablespoons of the butter in a wide frying pan over medium-high heat. Add rabbit, a few pieces at a time (do not crowd pan); cook, turning as needed, until browned on all sides.

Transfer rabbit to a shallow 3 1/2 to 4-quart baking pan. Move frying pan into an open area, away from exhaust fans and flammable items. Add brandy and ignite (woohoo!); shake or tilt pan until flame dies. Pour brandy mixture over rabbit in baking pan; set aside.
Melt remaining 2 to 3 tablespoons butter in frying pan over medium heat. Add onions, minced parsley, and mushrooms; cook, stirring often, until onions are soft, about 5 minutes. Stir in mustard, cream, and lemon juice and bring to a boil. Pour sauce over rabbit. Cover and bake at 190 degrees C (375 degrees F) until rabbit is tender when pierced, about 45 to 55 minutes.
Drain cooking liquid into a wide frying pan and bring to a boil; boil for 1 minute. Beat some of the hot liquid into egg yolks, then return yolk mixture to pan. Cook, stirring constantly, until sauce is thickened - do not boil. Season to taste with salt. Transfer rabbit to a serving dish. Pour sauce over rabbit and sprinkle with chopped parsley. I served this with sugar-glazed carrots with sesame seeds, and creamy mashed potatoes.

It was delicious! Very creamy and rich, and the rabbit had sufficient strength of flavour to hold its own amongst the clamour of the other ingredients. Well done, me!
Dessert was a vat of blood thinner.
 Honey possesses a wealth of features, making it so much more than a humble toast topper. It has proven antibacterial and antioxidant qualities; it's also a humectant which makes it ideal for baking and cooking. The versatility of honey is well established and let's face it; if you're constantly being sought by someone smarter than the average bear, you must be doing something right.
At this time of year, blossom at the orchard is in full swing. It's 6:30 am on an overcast Thursday and I'm roaming the orchard with the guys from Kintail Honey, dropping off hives to assist in pollinating the apple trees. The bees are docile at this time of day which makes the manhandling of the hives a little easier (a stiff gin before commencing work would be totally understandable).

With 70 hectares of orchard to cover, the place is saturated with bees and hives to ensure effective coverage - the orchard has a 3-4 week period in which pollination has to occur. Pollination comes about as a result of bees gathering nectar. In its search, a bee will travel from blossom to blossom, and as it does so, it brushes against the stamen, the pollen-bearing part of a flower, picking up pollen grains. When the bee lands on another blossom, some of the pollen from its first visit sticks to the blossom at its latest stop - pollination can now take place. Once fertilised, fruit will eventually develop.
Bees can cover a five kilometre range but if they're in an area full of blossom, they usually won't travel any further than a couple of kilometres.
These particular hives are called Langstroth hives.

Hive placement is important. Bees are more active when they're warm, so hives are kept away from shelter belts and buildings, anything which may shade or block sunlight. With this in mind, the hive exit is always placed facing north to take advantage of the sun.
 The tool below is a smoker, an essential tool for the protection of bee handlers. This device is made up of a firepot, bellows and a nozzle. The bellows force air through the fuel-filled firepot; the resulting smoke pours out of the nozzle, and is directed into the beehive.

The smoke has two effects: it dulls the senses of the hive's guard bees, preventing them from releasing a pheromone that alerts the hive to a threat, summoning bees to attack intruders. The second effect of smoke is to suggest to the inhabitants that the hive could be on fire. This triggers a feed response where the bees gorge themselves on their honey, preparing for a possible evacuation. This distracts the bee, allowing time for the beekeeper to work on the hive. Bees at this stage find it hard to use their stinger, a honey-stuffed stomach impeding use of the stinger muscles.
Once the hives are set up, Kintail send people to periodically check on the hives and the condition of the bees, as well as to remove any honey. On occasion, they'll also remove some of the brood (the eggs, larvae and pupae) to de-strengthen it. This prevents them from swarming and allows more room in the hive.

At any one time, there are an astounding number of bees in a hive. In winter, around ten thousand bees; during the summer, up to a hundred thousand! Bees have a lifespan of between thirty five to fourty five days and will often die of exhaustion, living as they do very active lives.
Bees will die if exposed to insecticides and are subject to predators such as insects and birds. Varroa mites - tiny parasites that feed off bees and bee brood - are a major problem for bees, and have led to the death of whole hives. Varroa mites cannot be erradicated, only controlled; hives contain plastic strips treated with miticide.

So how is honey made? As mentioned earlier, bees roam the countryside collecting nectar. This is brought back to the hive and processed into honey by the worker bees, through a process of partial digestion, where enzymes break the complex sugars into simple sugars, a more digestible form for the bee. It is then stored in the cells of the honeycomb, exposed, for evaporation to take place (it has a high water content). Evaporation is essential so that fermentation and spoilage of the liquid by bacteria don't occur. Interestingly, the evaporation process is hurried along with the aid of the bees fanning the liquid with their wings! The resulting syrup is considerably thicker and will store for a long time, with the bees capping the honeycomb cells with plugs of wax - this will feed the bees during the winter. Often, more honey is produced than will ever be consumed by the bees and this is what is taken by the beekeeper.

Over the course of the morning, I was stung twice - once on the neck and then on my forearm. Twenty four hours later, the forearm was the size of a Christmas ham (honey glazed).
 Feeling inspired, I bought some honey and proceeded to look for something tasty to make with it. Here's a yummo recipe I lifted from Airborne Honey's recipe page - the ice cream I made was rich and sweet (in the photo, it's a bit melty, brought about by spending too much time artfully arranging what turned out to be a lacklustre shot). There's a bit of elbow grease required - well worth it though.
Rata Ice Cream
1/2 cup (100gms) Rata honey
4 tblspns water
4 egg yolks
300 mls whipped cream
Melt the honey and water together slowly until the honey has dissolved. Stir, then bring the liquid to a rolling boil, until there are little even-sized bubbles all the way across the pot. Whisk the egg yolks in a large bowl with an electric beater. With the beater running, slowly pour in the hot syrup. Continue whisking until the mixture has cooled and is double its volume, or as thick as whipped cream. Fold whipped cream into mixture, checking sweetness. Pour into a mould, cover with plastic wrap and freeze for a minimum of 8 hours.
To Serve
Leave at room temperature for 5-10 minutes to soften slightly. Run a knife around mould, sit mould momentarily in 2.5 cm of hot water and put ice-cream onto a serving platter. Garnish with Southern Rata flowers if possible. Serves six.

And now for something extra:
- Information about bee and wasp stings Clicky
- Bee hives Clicky
- National Beekeepers Association of New Zealand Clicky
- Beekeeping in NZ (the podcasts are interesting) Clicky
Apologies for the big delay in posting. Both my laptop and the desktop are dying!
- Deep-fried Coca Cola (when I lived in the US, you would see this kind of stuff at the county fair - good times!) Link
- How to open a coconut Link
- Cooking on your car's manifold (another Instructables link - great site!) Link
- Flip Grater, kiwi singer and songwriter - The Cookbook Tour Link
- Some common wine questions Link
- Integrating commonly-used kitchen utensils into kitchen knives Link
- Korean tornado potato Link
- Top 10 food books every chef should own Link
- The Anarchist Cookbook Link
- US Prison food convention Link
- Ethanol cocktail set Link
- Burn notes into your toast Link
- Electrolux Global Design Competiton (innovative home appliances designed and submitted for this prestigious contest - it's a flash site so no links from here - just take a look around) Link

Whoa there, ginger!
A wee while ago, I made my first ever batch of ginger beer. Having spent the last two weeks maturing, it was now time to unearth it and subject it to the taste test.
The bottle was popped into the fridge the night before, so it was well and truly chilled. There was sediment at the bottom, so the bottle was tipped upside down to distribute it evenly through the liquid. Popping the cap, there was the strong smell of yeast. Lots of fizz too, so the cap's sealed well.

The colour looked just like a commercial brew; a good, earthy downbeat yellow colour. Still plenty of fizz after five minutes. Some floaties - just tiny pieces of ginger (I'm hoping).

And how did it taste? Fizzy. Not very sweet - in fact, rather dry and crisp. The ginger flavour was slight but it was very warming and spicy. It was a little disappointing, a six out of ten.

I have my second batch due for bottling this weekend. I've tinkered with the recipe somewhat, in an attempt to improve upon this batch; I've doubled the daily dosage ginger from one to two teaspoons to try to enhance the ginger flavour. I'm also considering increasing the sugar content that goes into the beer solution, as well as adding honey (I'm still working out how much of that to add - I'm doing this purely to add a little depth to the beer's flavour). It's been a fun little experiment and one I look forward to carrying on with. I'll add to this post when batch v1.1 is due for sampling - fingers crossed!
In an attempt to de-clutter my bookmarks, and mimicking the style of Boing Boing's weekly roundup, I bring you some links to interesting food-related articles and posts I've picked up in the course of wandering the internet:
- Build your own outdoor pizza oven Link
- Car-baked chocolate chip cookies Link
- Cooking with rockstars Link
- An oldie: super-expensive marmalade Link
- Make your own concrete kitchen benchtop Link
- imcooked.com - a web community for video recipe sharing Link
- The annual "Build a Better Burger" competition - burger recipes galore! Link
- Do you taste what I taste? The physiology of wine tasting Link
- 8 Foods you should eat everyday Link
- The Simpsons: food clips Link

 From the top: UK & US pork cuts (pics courtesy of Wikipedia)
If pork is the king of meats, then bacon would be like Princess Diana: loved by everyone, not around for long but enjoyed to the utmost while it was (I'm not sure where Dodi Fayed fits in here - a good foreign sausage, perhaps?).
Lovely bacon takes effort to find and can be rather expensive. Store-bought bacon, while not as pricey, doesn't cook well, releasing water and foam the moment it hits the pan. As for the taste, well, there's a good reason why you don't come across many poems titled, "Ode to Bog-Standard Bacon".
Imagine my delight then, when a few weeks ago I came across this intriguing post (via Metafilter) showing how you could make your own wet cure, resulting in the best tasting bacon in existence. It seemed relatively straightforward too, so with that it was off to the butcher and the supermarket.
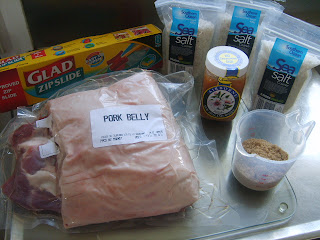
I bought half a pork belly which I then cut in half again at home. A pork belly makes for great streaky bacon, as you can see below.

The ingredients: with two pieces of belly to play with, I decided on using Dave's maple syrup mix on the first piece:
1/2 cup maple syrup
1/2 cup salt
1/2 cup brown sugar
and with the other, manuka honey (3/4 cup) and salt (1/3 cup). Honey is ideally suited for use in a wet cure. It serves the dual purpose of adding flavour, as well as being hygroscopic, which allows it to absorb moisture from the meat (more on this later). Working in action with the salt, this would prove to be a very effective cure.
Combine your ingredients and then rub into the raw pork bellies.
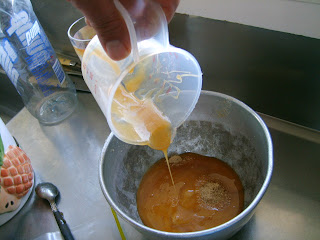
Once your belly is coated, pop it inside a sealable bag. Lay on a flat surface inside your fridge - its home for the next seven days - and turn the bag every two days. Oh, and don't use the crappy, over-priced "zip slide" bags you can see in the picture below. The wet cure seeped out of the end where the zipper-thingy was located.
 Time for a science lesson. As mentioned before, the salt and honey serve to lower the moisture content in the meat. This will hopefully prevent bacterial spoilage and maximise the effectiveness of the smoking process. Salt is a deliquescent material; that is, it absorbs moisture from a material and forms a liquid solution.
In the case of the honey, there are two principal sugars involved in achieving this end, glucose and fructose. According to Peter Brey from Airborne Honey, the amount and ratios of these two sugars varies from honey type to honey type. Fructose is hygroscopic and glucose is not. In the initial instance, the fructose would absorb moisture from the bacon up to a point of equilibrium.
In terms of imparting flavour, Peter suggests putting some thought into the honey you choose. Mild-flavoured honeys would not add any flavour other than sweetness, while medium-flavoured honeys could add a certain "something" and strong-flavoured honeys could make or break the flavour.
The amount of liquid in the bags increased markedly as the week progressed. At weeks end, they came out of the fridge, were drained and the bellies removed from their bags. Looking at them both, the pieces had shrunk considerably in size and were noticeably darker in appearance (see below), with the maple syrup-cured belly being the most changed.
At this stage, you should rinse them thoroughly, place them uncovered on a rack, and put them back in the fridge for twenty four hours. What's going to happen here is the development of the pellicle on the surface of the meat. This is a sticky, tacky layer that will perform a few key functions. Firstly, it seals the moisture remaining in the flesh; it prevents oils and fats in the flesh from rising to the surface and spoiling during smoking; and lastly, it provides a layer for the smoke to adhere to (information courtesy of Jay Harlow).

With the twenty four hours up, it's time for the hot smoking! Ordinarily, I would have used my little smoker, but I needed to be able to maintain a low heat for a longer period of time than it would have allowed. So with the beta-bacon in hand, it was off to Kerry's house to use his gas barbecue for the hot smoking process.
I planned on using different wood chips to smoke the meat; manuka chips for the manuka honey-flavoured bacon, and apple wood for the maple syrup-flavoured bacon. The apple wood isn't as strongly scented as manuka chips, ideal if I didn't want to overwhelm the flavour of the maple syrup.
Kerry lined the grill plate with foil and placed the first batch of wood shavings on top. These were formed into a mound, so as to prevent it from catching alight. The barbecue was lit, and kept at a low heat. Once the mound of chips started to smoke, the rack supporting the first pork belly was placed over the top.

Place your meat skin-side up so the smoke will rise and permeate the meat. Also, as the heat rises, the substantial layer of fat and collagen will gradually melt, basting the belly. We're trying here to achieve an internal temperature of 70 degrees celsius (150-ish fahrenheit) - use a meat thermometer and poke it in the thickest part of the belly. Put the lid back down when you're finished so the smoke can work its magic.
 Voila! Looking like this, it's little wonder the ancient Spartans ate it four times a day, believing it helped them to victory in so many battles*. Now, it could be eaten as is, but we are making bacon after all. Allow to cool and then cut to the thickness your heart (medical premiums up to date, hmm?) desires. Pop into a heated pan - no oil needed, there's quite a bit of fat on the belly - and fry away.

*patently untrue
And here we have the end product: thick slices of the most juicy, flavoursome bacon you will have this year.

Both pieces came out tasting wonderful. The maple syrup-flavoured bacon had a rich, sweet flavour with a pleasantly salty aftertaste. The manuka honey-flavoured bacon had a delicious woody flavour enhanced by smoking, with a distinct honeyed aftertaste. Both were smoked perfectly. This is now going to be a regular occurrence in my household - who can resist proper bacon! Let me add too, with hand over heart, that I will never buy bacon from a supermarket again. It would be interesting to try this with free range pork, or better still, wild pork - interesting flavours to be had from those two quarters.
A big "huzzah!" to the following folk: Kerry for the use of his barbecue and his smoking skills; the helpful (and hot!) Irish lady with the gorgeous accent at the PPCS meat store in Hastings; Peter Bray from Airborne Honey; and Dave Selden at BS Brewing, his home-made bacon being the inspiration for this post.
PS. For the curious and those with a bit of time on your hands: bacon placemats!