skip to main |
skip to sidebar

Before I leave the house to see in the new year, wearing naught but a smile and a set of bagpipes, I want to wish you all the very best for the new year. It's going to be an interesting one for me - I've handed in my notice at work to pursue a career in food. More on that at some later date; just to say for now that I've finally realised that there's no such thing as 'the right time' to do something, and that I'm not getting any younger...
Enough homilies. Make sure you have lots of fun tonight, get rowdy, kiss someone...
Again, all the very best for 2008.
 Free Rice is a food-linked word game. How to play? A word is offered and your job is to select the right definition for it from a list. If you get it right, the next word offered is harder; if you get it wrong, an easier word is offered. Each correct answer generates 10 grains of rice for distribution by the United Nations World Food Program.
Free Rice has two goals:
Free Rice is a food-linked word game. How to play? A word is offered and your job is to select the right definition for it from a list. If you get it right, the next word offered is harder; if you get it wrong, an easier word is offered. Each correct answer generates 10 grains of rice for distribution by the United Nations World Food Program.
Free Rice has two goals:
- Provide English vocabulary to everyone for free
- Help end world hunger by providing rice to hungry people for free
The rice is paid for by advertising on this incredibly popular site, run by One World Projects.
Clicky to play.

It's been four weeks since I started the limoncello. The liquid smells very lemony and the smell of the alcohol made my nose wrinkle. The peel should be completely colourless, so it's now time to separate it from the alcohol. Once done, we'll be adding the sugar syrup.
Firstly, find a container large enough to hold the alcohol, as well as the sugar syrup you'll be adding later - it needs to be about a litre or so in size. Moisten a paper coffee filter with water (to stop it from absorbing the lemon oils and alcohol) and place inside a funnel. Pop the funnel in your container and then gradually add your alcohol - allow this to drip through and hopefully you'll have a nice, clean liquid. When you finally get to the peel, squeeze the filter (gently) to get as much of that lemon oil out as you can.

Make your sugar syrup by combining a cup of sugar and a cup of water in a pot. Bring to the boil and simmer for a couple of minutes; remove from the heat and allow to cool. As you add the syrup to the alcohol, give it a stir and sample it - add more or less syrup according to taste. Finally, pour into your bottle, seal and then place in a cool, dark spot to infuse.
It's drinkable after a week or so but clearly the longer you leave it, the better it will taste. Enjoy!
Whoops - for those who didn't already know, chill it before drinking. It's also a sipper, not a quaffer...


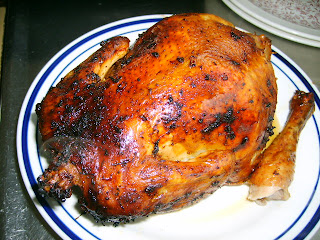
Hello! Just a quickie post today - I made beer can chicken on the barbecue for dinner and thought I may as well grab the camera and show you how it went. It's super easy to do (this is the first time I've ever made it), with the most splendidly juicy outcome!
All you need is an uncooked chicken, a can of beer and an oven or barbecue to cook it in/on. I also made a rub for the chicken:
- 2 teaspoons of coriander seeds
- 2 garlic cloves
- 2 teaspoons paprika
- zest of 2 limes
- juice of 2 limes
- salt
Roughly grind the seeds with a mortar and pestle. Add garlic and zest; grind until you have a rough paste. Add juice, paprika and a smattering of salt, mix well and apply to the chicken. I used this particular rub because I thought it would go well with my choice of beer, Monteith's Radler, a zesty lemon and lime flavoured lager. Seeing as it only comes in bottles, I poured it into another can I happened to have handy.
On to the chicken: remove the giblets, rinse the chicken inside and out and dry with a paper towel. Apply some of the rub to the interior and the remainder on the outside - use your hands, rub vigorously. Now, you'll only need half a can of beer for cooking purposes, so discard the portion you won't need down the nearest throat. Once that's done, punch another two holes in the top of the can.
Now for the tricky part: holding the chicken upright, lower it onto the beer can so the can fits into the cavity (see photo above). The chicken's legs should be leaning forward with the brunt of its weight supported by the can.
This is best cooked on a barbecue with a hood; failing that, your oven will work just as well. If you're using gas, turn the heat on full while you're prepping, and turn down to medium or medium/low when placing the chicken on to cook. Place the chicken on a dish (this will collect the juices, otherwise they'll run off and onto the flame causing flareups). Pop it on the heated barbecue plate, away from direct heat and leave to cook with the hood down for 1 1/4 to 1 1/2 hours. Test the meat with a thermometer poked in the thickest part of the chicken - it needs to be 85 degrees celsius to be cooked. You can also jab it with a fork - if the juices run clear, it's ready.
Once done, grab some oven gloves and remove from the heat. Using tongs, carefully remove the can from the chicken - bear in mind everything will be very hot and the can will still have some (hot) beer in it. Once done, leave the chicken to rest for ten minutes before carving.
There are German businessmen who'd pay good money to have this done to them...
 And there we have it! A wonderfully crisp, juicy and aromatic chicken. It really was quite simple to do and was very tasty - give it a whirl!
 There are concerns about subjecting aluminium cans to heat due to possible toxicity arising from the can's plastic lining, metals and paints. According to this article, the risks are negligible, due to the relatively low heat involved in the cooking process, compared to that of its manufacture clickety.
The following link discusses beers worth experimenting with when making beer can chicken - the article is American, but their core advice is sound clickety.
- DIY candy floss machine (Instructables) Clickety
- Are you an arcade gamer? Enjoy a drink? (Boing Boing) Clickety
- Interested in offal? Check out Offal Good Clickety
- Pancakes in a can (USA, bless...) Clickety
- For hire: truffle hunter (Smithstonian Magazine) Clickety
- Super simple popcorn maker (video clip) Clickety
- Ancient beer pots point to origins of chocolate (New Scientist) Clickety
- Get 20 free drinks using 20 different bar tricks Clickety
 Nothing beats the sweet, smoky odour of food prepared on a smoker. While many New Zealanders own small smokers which hot smoke food, backyard cold smoking isn't nearly as widespread an activity. This is a shame as cold smoking allows greater control over the flavour of food being smoked. It can be time consuming but as is often the case, the end result makes it well worth while.
Cold smoking is the process of using smoke to cure and flavour foods without cooking them. In the past, this was done as a means of preserving fish and game for consumption during the leaner, less bountiful times of the year. The temperature range is between 12 to 25 degrees celsius, or room temperature, and the smoking time can take anywhere from a few hours to several days. To eliminate the risk of spoilage, the food can be cured, in the form of salting or brining, prior to smoking. Large setups allow for the smoking of chicken and game birds, fish and large cuts of meat. Cold smoking is ideal too, for flavouring small produce such as cheese, olives and salt.
To achieve the necessary low temperatures, the fire needs to be kept separate from the food being smoked. This is achieved by drawing the smoke from the heat source to the smoking chamber through piping or tubing, as seen in the technical diagram below.
 With ideas cribbed from various books and websites, and with the help and expertise of Chocky, friend and backyard engineer, I set out to make my own mini cold smoker. Basically, it comprises two large stockpots; one sitting on an electric hotplate, connected to the other pot by a length of duct pipe. With the hotplate on, smoke from the smouldering sawdust is drawn into the other pot through a little battery-powered computer fan, with the heat dissipating as it makes its way across the divide - simple as that!
I was going to need:
- 2 x 9 litre stockpots (mine were cheapies from the big red shed, a tenner apiece)
- Duct pipe, 3 metres long, 100mm circumference (found at any hardware store; mine cost $25)
- Computer fan (whipped from an old computer case; 12 volt)
- Empty can, 100mm circumference (or as close as you can); also, it needs to be large enough to hold the fan (the fan was a tad bigger than the can, but you'll see what I did to get around that)
- Electric hotplate
- Grinder, jigsaw, drill, rasp and other assorted tools
- 12 volt battery (a car battery)
- Cable ties (pipe clips would be good but I couldn't find any for the duct pipe in a 100mm size)
- Wire, to extend those already on the fan, about 1 metre in length
- Clips, for the wire so it can connect to the battery
- 2 wooden drawer handles
On to business: I drew an outline of the can on the bottom of one of the stockpots with a marker. I drilled a little hole for the jigsaw and began to cut my circle. When you're finished, use a rasp to file off any jagged edges and then wash the pot to remove filings and dust. This pot is our smoking chamber.
The empty can will stick out of the hole in the bottom of the pot - this is what the duct pipe will be attached to.

Chocky built a stand to hold the smoking chamber, using scraps lying around the workshop. We have a tripod, about a metre high with a supporting platform. The hole is to accomodate the can poking out of the smoking chamber.

Slits are cut in the top of the empty can and then flared to stop it from slipping through the hole in the bottom of the smoking chamber. It's hard to make out in the photo but the can holds the computer fan. It initially wouldn't fit, so I ground down the corners with my grinder. Don't take too much off; you want it to be absolutely snug inside the can. The fan will draw the smoke up through the duct pipe from the pot on the hotplate.

Place the smoking chamber over the hole in the platform. Pop the can into the hole in the smoking chamber, which in turn should be sitting over the hole in the platform. I was going to rivet the can to the pot, but I wanted to make the unit portable and easy to disassemble.

The fan's wires come out of the top of the can and lead out through a hole I drilled through the bottom of the pot.

With the smoking chamber sitting on the platform, add your extra length of wire and then the clips for the battery.

Take one end of the duct pipe and attach to the can with your cable tie or clip.

Now for the other pot - this will hold the sawdust and sits on the hotplate. Cut a hole in the pot lid for the other end of the duct pipe. Make it slightly smaller than the diameter of the pipe - it will make for a snug and secure fit. File any rough edges, rinse the lid in water to get rid of dust and filings, then slowly twist the pipe into the hole. Now screw the two wooden drawer handles into the lid; wood is a poor conductor of heat, so no burnt fingers for you when it comes to removing the lid to add more sawdust.
As mentioned before, the smoke in this pot is generated by the smouldering sawdust, heated by the hotplate. As the heat rises, it carries the smoke up through the pipe. With three metres of pipe to traverse, the heat quickly dissipates so by the time it reaches the smoking chamber, the smoke is at room temperature.

Voila! One gleaming cold smoker, ready for action.

All I need now is to install some circular racks inside the smoking chamber to hold the food - a visit to some second hand stores and a garage sale or two should turn something up - old barbecue racks or similar should do the trick. Once that's done, it'll be time to give it a whirl - I'm thinking about re-visiting my previous bacon experiment and later, I'll smoke some peppers to make my own smoked paprika. I'll keep you posted...
A big, sabre-rattling "huzzah!" to Chocky for all his help (he practically built it all) - cheers, son!
 Limoncello is an Italian lemon liquer made from lemon zest, alcohol, water and sugar. It's a lovely bright yellow colour with a sweet lemony flavour, but lacks that tart, sour tang since it contains no lemon juice. It's typically served chilled as a soothing after-dinner drink to aid digestion. Nora had made some and it piqued my interest, so after sifting through some recipes, I thought I'd give it a whirl - read on...
Limoncello
- 750 ml bottle of vodka, 50% alcohol (100 proof) or as close to it as possible
- Lemons (I used Yen Ben lemons - they have a good oily skin and the folk at Lemon Z use them!)
- 1 Lime
- Zester (or a microplane, you lucky swine) or a paring knife
- Jar with screw-top lid (make sure it's airtight)
Grate/zest your lime and lemons, then place in the jar. If you don't have a zester, a paring knife is fine; just keep clear of the pith as you're peeling.

Pour all your vodka into the jar with the zest and then replace the jar lid. The alcohol will leach the flavour and colour from the zest over the next few weeks. Unfortunately, because I'm using a (relatively) low alcohol vodka, it will take a little longer to do its job - ordinarily, it's a couple of weeks.
Just as an aside, I had a hell of a time finding vodka with 50% alcohol, with most hovering between 38 to 40%. Smirnoff triple distilled was the highest i could find, sitting at 43% - if anyone knows why this is the case in NZ, leave a message in the comments below.

By the way, if you don't have a jar you could use stainless steel or even a plastic container - it just has to be air-tight. If things go well, the liquid in a few weeks time will be a bright yellow colour with a distinct lemon smell, with the zest being drained of colour.
 And that's it for now! I'll be posting regular updates on its progress - the next step in the process will be filtering the liquor and the addition of a sugar syrup, finishing with a settling period.
Quick explanation of "proof" versus "alcohol level": basically, the proof figure you see on a bottle label is the alcohol percentage figure multiplied by two, so 100 proof vodka has a 50% alcohol volume, gin with 42% alcohol is 84 proof, and so on.
Addendum: apparently, I could have used grappa (cheers, Denise), or indeed a whole host of clear, high alcohol spirits and not just vodka. They would however, add a slight twist to the resulting flavour of the limoncello.
Finally, what to do with the left-over, denuded lemons?
Homemade Lemonade
- 2 1/2 cups water
- 1 1/4 cup sugar
- 1/2 teaspoon finely shredded lemon zest
- 1 1/4 cup lemon juice
In a pot, heat and stir water and sugar over medium heat until the sugar is dissolved. Remove and cool for about 20 minutes.
Add lemon zest and lemon juice to the sugar syrup. Pour into a covered jar and chill. For a glass of lemonade, stir together 1/2 a cup of the lemonade base and 1/2 cup of cold water. Add ice cubes and serve (for fizzy lemonade, clicky). I'm not sure how long the base will keep for in the fridge, but the batch I made barely saw out the week so it probably won't be an issue.

A big thanks to Nora at Life's Smorgasbord for her inspiration (did you know her man has a BBQ called "Stallion" - respect!).
Here's a couple of sites with limoncello recipes: here and this two-parter, one and two.
- High tech kitchen appliances (the gallery's fantastic! PopSci) Link
- Japanese bread-in-a-can (BB Gadgets) Link
- Salt early and often Link
- Vintage wine fraud (The New Yorker) Link
- How to build a kegerator Link
- Jamie Oliver Survival Kit Link
- Have you got an iPod Shuffle? Do you drink beer? Do you use keys? You need this Link
- Delight or abomination: you decide Link
- Lego cake (BB Gadgets) Link
- How to salt water (check the reviews!) Link
- US state and county fair foods (slideshow) Link
 Warning: there are some graphic photos in this post.
You needn’t starve working on an orchard. Leaving aside the veritable fruit salad growing on the trees, the orchard serves as home to all manner of edible flora and fauna: wild blackberries, mushrooms, puha, watercress; eel, duck, peacock (use the feathers to enhance the appearance of a hat!), sheep (make sure they’re yours), cattle (they have to be on your side of the fence), hare and rabbit.
Rabbit is an under-appreciated meat in this country. It is, unfortunately, abundant and easily accessible. Rabbit cooks well and lends itself to rich, bold sauces. Young rabbit isn’t particularly strong in flavour, almost resembling factory-reared chicken; older rabbit is much more flavoursome while not being overly gamey.

With spring having sprung, rabbits are plentiful. The beasts are also looking rather plump too, and not having eaten rabbit in a long time, it seemed the perfect opportunity to reacquaint myself with the taste.
Kerry, being the resident hunter and firearms expert, agreed to take me out hunting. Armed with a .22 rifle, it was into the station wagon - being nice and low, it made it easy to spot rabbits under the apple trees (stealth however was sacrificed for comfort). We set off, two men engaged in the age-old struggle of man versus small cute furry beast.

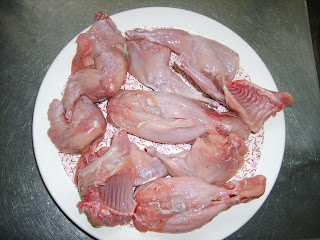
We saw a lot of hares but no rabbits. Night would have been a more ideal time for hunting as they are nocturnal (er, rabbits are actually crepuscular - most active around dusk and dawn) but I wanted photos. Two hours later, Kerry bagged a couple and it was back to the house for skinning. This is best done outside as the smell can be quite musky.

Removing the pelt is relatively easy. With the rabbit lying on a flat surface, pinch the skin on its underside and carefully insert your blade there, cutting to create a slit. Put the knife aside and insert your fingers, separating the skin from the rabbit. Go all the way around the rabbit (see below). Now tear or cut the skin so it is separate from the head.

Grasping the loosened edges of skin, pull down until the front legs are free.

Continue pulling down until the back legs are free.

To remove the organs and digestive tract, carefully insert the knife at the base of the stomach and slowly move the blade up until you reach the sternum, being careful not to cut the intestines. Pull apart the covering and remove the contents starting from the top and working your way down to where you started with the blade.

Examine the organs for anything unusual, such as lumps, bumps, odd-looking growths or cysts - discard the rabbit if you find any. Carefully pull the lower intestine through the anus and discard the guts in a secure rubbish bin - failure to do so may result in your neighborhood pets spreading their stinky goodness around your yard. Composting them may be an option but I'm not sure how - ask around or take a look online.
Cut off the head and the lower joint of all four legs. To remove the tail, cut a V at the point where the tail connects with the body.
 Now check the body for cysts or lumps and again discard the animal if you come across anything unusual. Give the rabbit a quick rinse under running water, then cut into sections. Place in a sealable bag and leave in your fridge to settle for a few days.

Voila! Fresh rabbit, prepped for cooking.
After going to all this effort, I wanted to do something rather fancy. After digging through my library, I found this recipe in an old English game cookbook. Butter, eggs, cream, brandy... Ignoring the sudden crushing sensation in my chest, it was off to the kitchen.
Rabbit in Mustard Sauce
2 rabbits (about 2 1/2 pounds each), cut up
Salt
About 1/3 cup all-purpose flour
1/2 cup butter
3 tablespoons brandy, warmed
1/2 cup thinly sliced green onions
1/4 cup minced parsley
1 pound small whole mushrooms; or large mushrooms quartered
2 tablespoons Dijon mustard
2 cups whipping cream
2 tablespoons lemon juice
3 egg yolks, lightly beaten
Chopped parsley
Rinse rabbit and pat dry. Sprinkle rabbit pieces with salt, then dust with flour. Melt 5 to 6 tablespoons of the butter in a wide frying pan over medium-high heat. Add rabbit, a few pieces at a time (do not crowd pan); cook, turning as needed, until browned on all sides.

Transfer rabbit to a shallow 3 1/2 to 4-quart baking pan. Move frying pan into an open area, away from exhaust fans and flammable items. Add brandy and ignite (woohoo!); shake or tilt pan until flame dies. Pour brandy mixture over rabbit in baking pan; set aside.
Melt remaining 2 to 3 tablespoons butter in frying pan over medium heat. Add onions, minced parsley, and mushrooms; cook, stirring often, until onions are soft, about 5 minutes. Stir in mustard, cream, and lemon juice and bring to a boil. Pour sauce over rabbit. Cover and bake at 190 degrees C (375 degrees F) until rabbit is tender when pierced, about 45 to 55 minutes.
Drain cooking liquid into a wide frying pan and bring to a boil; boil for 1 minute. Beat some of the hot liquid into egg yolks, then return yolk mixture to pan. Cook, stirring constantly, until sauce is thickened - do not boil. Season to taste with salt. Transfer rabbit to a serving dish. Pour sauce over rabbit and sprinkle with chopped parsley. I served this with sugar-glazed carrots with sesame seeds, and creamy mashed potatoes.

It was delicious! Very creamy and rich, and the rabbit had sufficient strength of flavour to hold its own amongst the clamour of the other ingredients. Well done, me!
Dessert was a vat of blood thinner.
 Honey possesses a wealth of features, making it so much more than a humble toast topper. It has proven antibacterial and antioxidant qualities; it's also a humectant which makes it ideal for baking and cooking. The versatility of honey is well established and let's face it; if you're constantly being sought by someone smarter than the average bear, you must be doing something right.
At this time of year, blossom at the orchard is in full swing. It's 6:30 am on an overcast Thursday and I'm roaming the orchard with the guys from Kintail Honey, dropping off hives to assist in pollinating the apple trees. The bees are docile at this time of day which makes the manhandling of the hives a little easier (a stiff gin before commencing work would be totally understandable).

With 70 hectares of orchard to cover, the place is saturated with bees and hives to ensure effective coverage - the orchard has a 3-4 week period in which pollination has to occur. Pollination comes about as a result of bees gathering nectar. In its search, a bee will travel from blossom to blossom, and as it does so, it brushes against the stamen, the pollen-bearing part of a flower, picking up pollen grains. When the bee lands on another blossom, some of the pollen from its first visit sticks to the blossom at its latest stop - pollination can now take place. Once fertilised, fruit will eventually develop.
Bees can cover a five kilometre range but if they're in an area full of blossom, they usually won't travel any further than a couple of kilometres.
These particular hives are called Langstroth hives.

Hive placement is important. Bees are more active when they're warm, so hives are kept away from shelter belts and buildings, anything which may shade or block sunlight. With this in mind, the hive exit is always placed facing north to take advantage of the sun.
 The tool below is a smoker, an essential tool for the protection of bee handlers. This device is made up of a firepot, bellows and a nozzle. The bellows force air through the fuel-filled firepot; the resulting smoke pours out of the nozzle, and is directed into the beehive.

The smoke has two effects: it dulls the senses of the hive's guard bees, preventing them from releasing a pheromone that alerts the hive to a threat, summoning bees to attack intruders. The second effect of smoke is to suggest to the inhabitants that the hive could be on fire. This triggers a feed response where the bees gorge themselves on their honey, preparing for a possible evacuation. This distracts the bee, allowing time for the beekeeper to work on the hive. Bees at this stage find it hard to use their stinger, a honey-stuffed stomach impeding use of the stinger muscles.
Once the hives are set up, Kintail send people to periodically check on the hives and the condition of the bees, as well as to remove any honey. On occasion, they'll also remove some of the brood (the eggs, larvae and pupae) to de-strengthen it. This prevents them from swarming and allows more room in the hive.

At any one time, there are an astounding number of bees in a hive. In winter, around ten thousand bees; during the summer, up to a hundred thousand! Bees have a lifespan of between thirty five to fourty five days and will often die of exhaustion, living as they do very active lives.
Bees will die if exposed to insecticides and are subject to predators such as insects and birds. Varroa mites - tiny parasites that feed off bees and bee brood - are a major problem for bees, and have led to the death of whole hives. Varroa mites cannot be erradicated, only controlled; hives contain plastic strips treated with miticide.

So how is honey made? As mentioned earlier, bees roam the countryside collecting nectar. This is brought back to the hive and processed into honey by the worker bees, through a process of partial digestion, where enzymes break the complex sugars into simple sugars, a more digestible form for the bee. It is then stored in the cells of the honeycomb, exposed, for evaporation to take place (it has a high water content). Evaporation is essential so that fermentation and spoilage of the liquid by bacteria don't occur. Interestingly, the evaporation process is hurried along with the aid of the bees fanning the liquid with their wings! The resulting syrup is considerably thicker and will store for a long time, with the bees capping the honeycomb cells with plugs of wax - this will feed the bees during the winter. Often, more honey is produced than will ever be consumed by the bees and this is what is taken by the beekeeper.

Over the course of the morning, I was stung twice - once on the neck and then on my forearm. Twenty four hours later, the forearm was the size of a Christmas ham (honey glazed).
 Feeling inspired, I bought some honey and proceeded to look for something tasty to make with it. Here's a yummo recipe I lifted from Airborne Honey's recipe page - the ice cream I made was rich and sweet (in the photo, it's a bit melty, brought about by spending too much time artfully arranging what turned out to be a lacklustre shot). There's a bit of elbow grease required - well worth it though.
Rata Ice Cream
1/2 cup (100gms) Rata honey
4 tblspns water
4 egg yolks
300 mls whipped cream
Melt the honey and water together slowly until the honey has dissolved. Stir, then bring the liquid to a rolling boil, until there are little even-sized bubbles all the way across the pot. Whisk the egg yolks in a large bowl with an electric beater. With the beater running, slowly pour in the hot syrup. Continue whisking until the mixture has cooled and is double its volume, or as thick as whipped cream. Fold whipped cream into mixture, checking sweetness. Pour into a mould, cover with plastic wrap and freeze for a minimum of 8 hours.
To Serve
Leave at room temperature for 5-10 minutes to soften slightly. Run a knife around mould, sit mould momentarily in 2.5 cm of hot water and put ice-cream onto a serving platter. Garnish with Southern Rata flowers if possible. Serves six.

And now for something extra:
- Information about bee and wasp stings Clicky
- Bee hives Clicky
- National Beekeepers Association of New Zealand Clicky
- Beekeeping in NZ (the podcasts are interesting) Clicky
Apologies for the big delay in posting. Both my laptop and the desktop are dying!
- Deep-fried Coca Cola (when I lived in the US, you would see this kind of stuff at the county fair - good times!) Link
- How to open a coconut Link
- Cooking on your car's manifold (another Instructables link - great site!) Link
- Flip Grater, kiwi singer and songwriter - The Cookbook Tour Link
- Some common wine questions Link
- Integrating commonly-used kitchen utensils into kitchen knives Link
- Korean tornado potato Link
- Top 10 food books every chef should own Link
- The Anarchist Cookbook Link
- US Prison food convention Link
- Ethanol cocktail set Link
- Burn notes into your toast Link
- Electrolux Global Design Competiton (innovative home appliances designed and submitted for this prestigious contest - it's a flash site so no links from here - just take a look around) Link

Whoa there, ginger!
A wee while ago, I made my first ever batch of ginger beer. Having spent the last two weeks maturing, it was now time to unearth it and subject it to the taste test.
The bottle was popped into the fridge the night before, so it was well and truly chilled. There was sediment at the bottom, so the bottle was tipped upside down to distribute it evenly through the liquid. Popping the cap, there was the strong smell of yeast. Lots of fizz too, so the cap's sealed well.

The colour looked just like a commercial brew; a good, earthy downbeat yellow colour. Still plenty of fizz after five minutes. Some floaties - just tiny pieces of ginger (I'm hoping).

And how did it taste? Fizzy. Not very sweet - in fact, rather dry and crisp. The ginger flavour was slight but it was very warming and spicy. It was a little disappointing, a six out of ten.

I have my second batch due for bottling this weekend. I've tinkered with the recipe somewhat, in an attempt to improve upon this batch; I've doubled the daily dosage ginger from one to two teaspoons to try to enhance the ginger flavour. I'm also considering increasing the sugar content that goes into the beer solution, as well as adding honey (I'm still working out how much of that to add - I'm doing this purely to add a little depth to the beer's flavour). It's been a fun little experiment and one I look forward to carrying on with. I'll add to this post when batch v1.1 is due for sampling - fingers crossed!