Showing posts with label beer. Show all posts
Showing posts with label beer. Show all posts
Wednesday, March 31, 2010
A Pint Of Ice Cream & A Pack Of Rothmans, Thanks
On the face of it, beer and ice cream make for an unlikely combination. Like steak and kidney muffins, or Sandra Bullock and Oscar statuettes, these are pairings that would never occur naturally but every once in a while, fate throws these things together and the end result can be pleasantly surprising (or just surprising).
In the case of my stout ice cream, it worked splendidly! I was initially dubious about the idea but on paper it seemed to make sense; stout is packed with so much body and flavour - toffee, chocolate and coffee notes - incorporate that into ice cream and you should have the recipe for a delicious bowl of "win". So, it was off to the Kai Lab to give it a go.
Saturday, December 08, 2007
Beer Can Chicken (with a Lime & Paprika Rub)

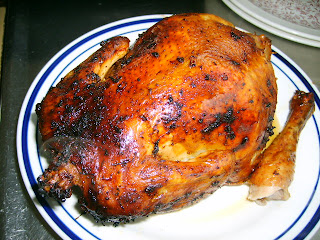
Hello! Just a quickie post today - I made beer can chicken on the barbecue for dinner and thought I may as well grab the camera and show you how it went. It's super easy to do (this is the first time I've ever made it), with the most splendidly juicy outcome!
All you need is an uncooked chicken, a can of beer and an oven or barbecue to cook it in/on. I also made a rub for the chicken:
- 2 teaspoons of coriander seeds
- 2 garlic cloves
- 2 teaspoons paprika
- zest of 2 limes
- juice of 2 limes
- salt
On to the chicken: remove the giblets, rinse the chicken inside and out and dry with a paper towel. Apply some of the rub to the interior and the remainder on the outside - use your hands, rub vigorously. Now, you'll only need half a can of beer for cooking purposes, so discard the portion you won't need down the nearest throat. Once that's done, punch another two holes in the top of the can.
Now for the tricky part: holding the chicken upright, lower it onto the beer can so the can fits into the cavity (see photo above). The chicken's legs should be leaning forward with the brunt of its weight supported by the can.
This is best cooked on a barbecue with a hood; failing that, your oven will work just as well. If you're using gas, turn the heat on full while you're prepping, and turn down to medium or medium/low when placing the chicken on to cook. Place the chicken on a dish (this will collect the juices, otherwise they'll run off and onto the flame causing flareups). Pop it on the heated barbecue plate, away from direct heat and leave to cook with the hood down for 1 1/4 to 1 1/2 hours. Test the meat with a thermometer poked in the thickest part of the chicken - it needs to be 85 degrees celsius to be cooked. You can also jab it with a fork - if the juices run clear, it's ready.
Once done, grab some oven gloves and remove from the heat. Using tongs, carefully remove the can from the chicken - bear in mind everything will be very hot and the can will still have some (hot) beer in it. Once done, leave the chicken to rest for ten minutes before carving.
There are German businessmen who'd pay good money to have this done to them...

And there we have it! A wonderfully crisp, juicy and aromatic chicken. It really was quite simple to do and was very tasty - give it a whirl!
 There are concerns about subjecting aluminium cans to heat due to possible toxicity arising from the can's plastic lining, metals and paints. According to this article, the risks are negligible, due to the relatively low heat involved in the cooking process, compared to that of its manufacture clickety.
The following link discusses beers worth experimenting with when making beer can chicken - the article is American, but their core advice is sound clickety.
Wednesday, September 19, 2007
Ginger Beer: Taste Test

Whoa there, ginger!
A wee while ago, I made my first ever batch of ginger beer. Having spent the last two weeks maturing, it was now time to unearth it and subject it to the taste test.
The bottle was popped into the fridge the night before, so it was well and truly chilled. There was sediment at the bottom, so the bottle was tipped upside down to distribute it evenly through the liquid. Popping the cap, there was the strong smell of yeast. Lots of fizz too, so the cap's sealed well.

The colour looked just like a commercial brew; a good, earthy downbeat yellow colour. Still plenty of fizz after five minutes. Some floaties - just tiny pieces of ginger (I'm hoping).

And how did it taste? Fizzy. Not very sweet - in fact, rather dry and crisp. The ginger flavour was slight but it was very warming and spicy. It was a little disappointing, a six out of ten.

I have my second batch due for bottling this weekend. I've tinkered with the recipe somewhat, in an attempt to improve upon this batch; I've doubled the daily dosage ginger from one to two teaspoons to try to enhance the ginger flavour. I'm also considering increasing the sugar content that goes into the beer solution, as well as adding honey (I'm still working out how much of that to add - I'm doing this purely to add a little depth to the beer's flavour). It's been a fun little experiment and one I look forward to carrying on with. I'll add to this post when batch v1.1 is due for sampling - fingers crossed!
Monday, September 10, 2007
From the Kai Lab: Ginger Beer

Ginger beer: nature's own champagne! This spicy, yet refreshing drink shares the same esteemed position in my book as properly cured bacon, Valrhona chocolate and being groped on a crowded bus. There are a gazillion recipes available, most of which are very similar. This delicious combination of ginger, lemon and sugar is easily made as you'll soon see.
You're going to need:
Bottles - plastic screw-top soft drink bottles will work very well. However, I used a dozen 330ml glass Tui stubby bottles. The size is convenient - you'll easily consume the contents and won't end up with half-consumed bottles of beer.
Bottle steriliser - obtained from your local home brew store; 250 grams cost me $6 (you're only going to use a few teaspoons of it with this batch)
Large jar and some fabric to cover it (muslin or similar - DO NOT use a jar lid or anything solid - the bug you're going to make needs to breathe)
Funnel
Large pot
To make the ginger beer bug:
1.5 teaspoons of dried yeast (I got mine from the home brew store, although you can buy the same kind from your supermarket)
2 teaspoons of ground ginger
2 teaspoons of sugar
600 ml of water (try and use spring or bore water - your town supply will have chlorine in it and while the amount is minute, it may impede the development of the bug)
To make the beer:
3.5 litres of water (see above for water)
500 grams of sugar
The juice of 2 lemons
Let's make the bug: place the yeast, ginger, sugar and water together in the jar and mix. Cover with your fabric and place somewhere warm. After twenty four hours, feed the bug a teaspoon of ground ginger and a teaspoon of sugar. Do this everyday for ten days. You should see it slowly bubbling away, the gas being carbon dioxide, a product of the yeast feeding on the sugar. Note the layer of sediment below.

On the tenth day, prepare your bottles. Clean and soak in the sterilising solution. It wouldn't hurt to put your other tools, like the funnel, into the solution too. When done, thoroughly rinse with cold water.
To make the beer, place one litre of water and the sugar into a big pot; heat gently, stirring until the sugar dissolves. Remove from the heat, add the rest of the water and the lemon juice.

This next step is a little tricky: pour off the liquid in the jar, while trying not to disturb the sediment. Strain this liquid through some cloth into the pot. Resist the urge to assist the liquid by squeezing the cloth - you want the liquid reaonably clean.

Once poured, cap your bottles. Incidentally, I found my bottle capper for $20 on Trademe, and it came with a big bag of caps. Don't press down too hard or the bottle neck will break (I lost one on my second attempt).

Once your bottles are all securely capped, store them somewhere cool and dark (retirement home managers tend to get a bit narky if you take them there, so try somewhere else). Keep them there for a couple of weeks and for goodness sake, don't shake them.
Wondering what to do with the bug? Divide it, place the other half into another jar and continue to feed them both as before - you'll soon have twice the beer you started with! Better still, give one of them away.
Once the two weeks is up, pull the bottles out (as many as you need) and chill thoroughly - this stops the activity of the yeast in its tracks. Before you open your bottle, tip it upside down so as to allow the layer of sediment that's formed to be evenly dispersed throughout the bottle (if you're a bit squeamish about this sort of thing (*snort*), you could decant the bottle or simply filter it through a napkin as you pour it into your glass). Now open and and enjoy! It should be pointed out that it'll be quite fizzy when it's opened and will pour out of the top unbidden - it's not called nature's champagne for nothing.
So what does it taste like? Is it like a bought one? Stay tuned as my first batch (v1.0) will be sampled this coming Sunday...
Look at these rioting students rampaging through the streets of Dunedin - if only they'd had some refreshing ginger beer instead...

Fancy a little experimentation? Add honey at the beer preparation stage, preferably something mild so it won't compete with the flavour of the ginger. Also, adding a teaspoon of liquid honey with your daily dosing of sugar and ginger makes the beer taste incredibly smooth (hat tip: Kerry). With my next batch, I might try using root ginger, to see if there's a significant difference in taste.
Addendum: found a great ginger beer at my local farmers market - "Honey Buzzz - Honey 'n' Ginger Beer" one of the great products produced by Hawkes Bay microbrewer, K.E.A. Brewing ltd (Williams St, Hastings).
Also, if you're using glass bottles, make sure they don't have a thread. The bottle capper has difficulty getting a good grip because the thread is in the way. My bottles did and that was the reason why I had breakage, not to mention some difficulty making an effective seal.
Subscribe to:
Posts (Atom)


