Showing posts with label vegetables. Show all posts

Friday, July 01, 2011

Cabbage Bread


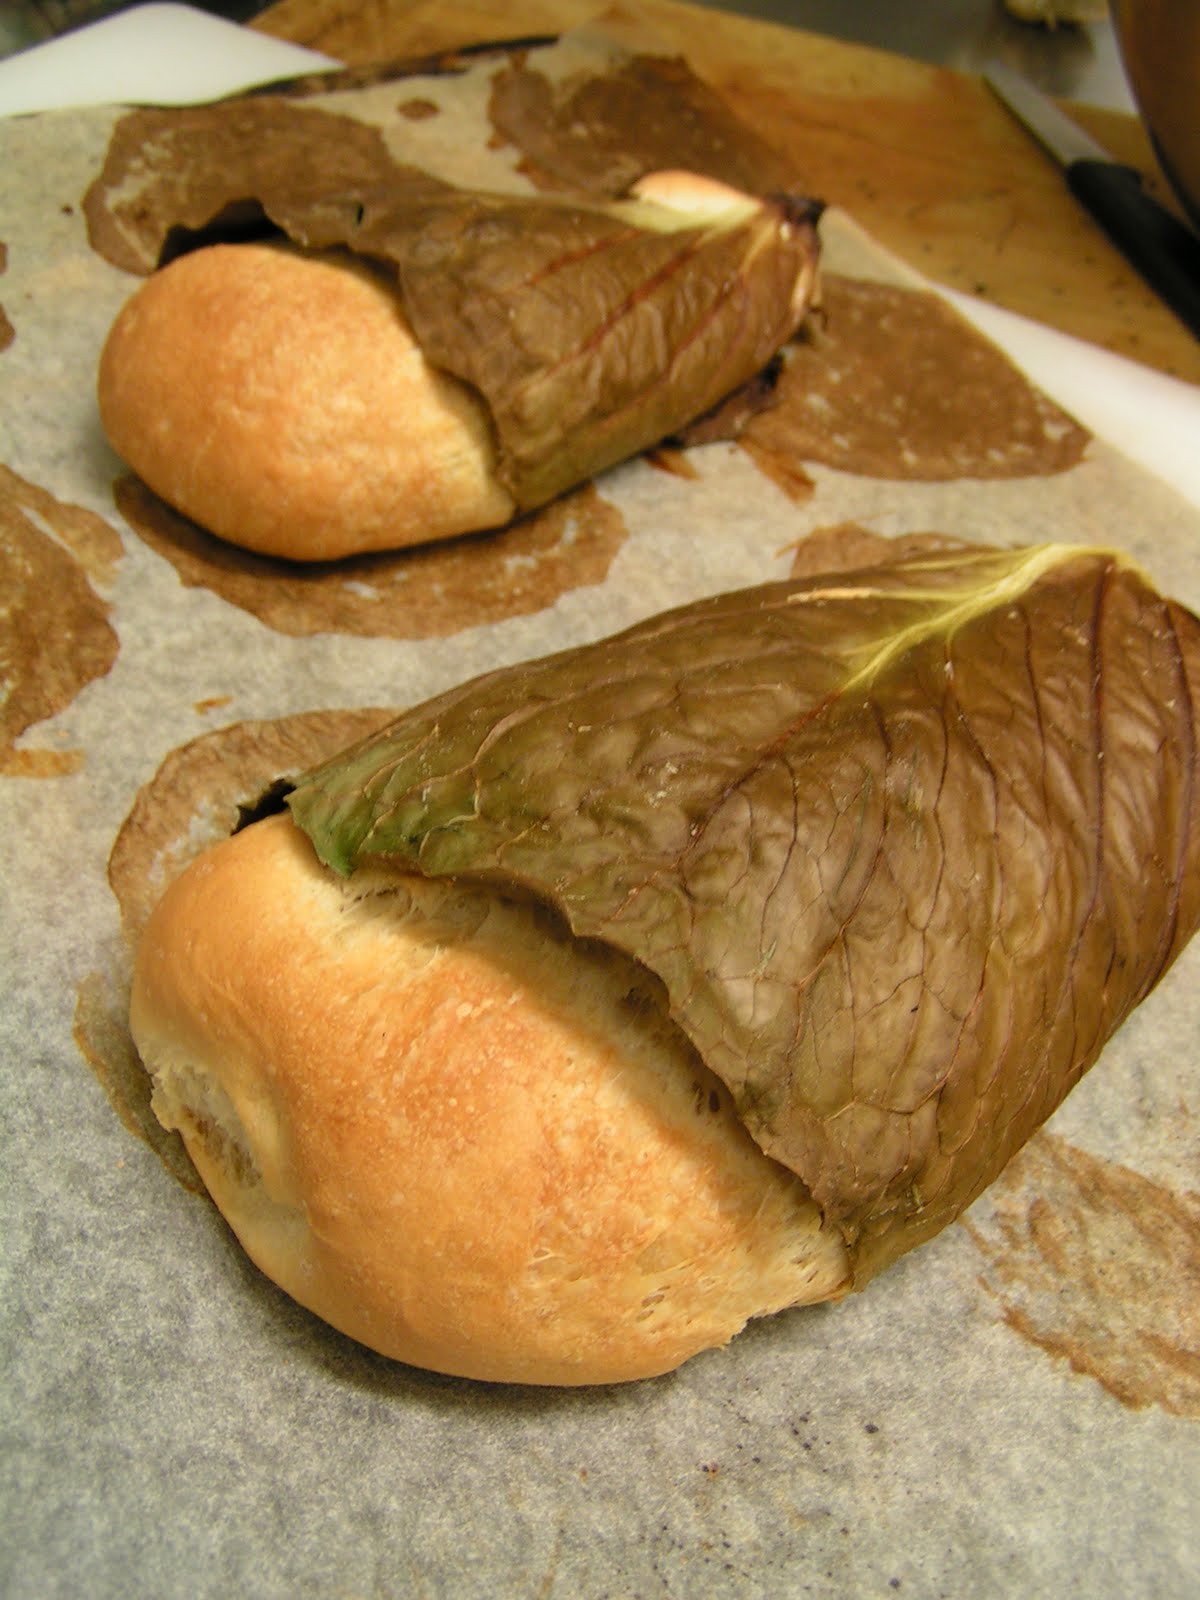
What manner of devilry is this? Triffid spawn? These fanciful looking critters are in fact standard, easily-baked-at-home rolls encased in cabbage leaves, resulting in this cool effect:


I came across the technique while reading an old English cookbook, "English Cookery, New & Old", by Susan Campbell. In parts of Gloucestershire, bakers would wrap bread dough in cabbage leaves before baking. Once in the oven, the cabbage leaves would soften, allowing the bread to expand and become imprinted with the vein pattern of the leaf.

Given that my first task upon arriving at work is to make bread, it seemed the perfect excuse to give it a try.

Monday, August 30, 2010

Brining & Marinating Olives


Olives to me are a reminder of summer flavours and warmer climes. Bite into an olive and straight away you're transported to the warm waters of the Aegean, the dry hills of Greece. You could almost imagine lying under an olive tree, watching angry centaurs hurl amphorae of wine at British film crews, in town to record crap like "How to Turn a Goat Pen into Your Mediterranean Holiday Home!" for the Lifestyle Channel. Such is the evocative power of the olive!

Their meaty, salty flavour has made them popular around the world, and here in New Zealand, the drier parts of our countryside play host to sizable tracts of land devoted to their production. Olives are a familiar sight on the shelves of our supermarkets, deli's, and community markets; it beggars belief to think that it wasn't so long ago that they were considered, in this country anyway, quite a rarity.

Sunday, February 21, 2010

Getting A Bit Chilli...


They've been a little slow to take off, but my chillis now seem to be flourishing. Keep an eye out for them in a post reasonably soon...

Thursday, February 11, 2010

From The Kai Lab: Smoked Paprika (Part 1)


It's a bit rough, and certainly not a patch on the real thing but pictured above is my tiny batch (two whole tablespoons!) of homemade smoked paprika!

Smoked paprika has its origins in Spain, where it's called Pimentón. Easily identified by its strong smoky aroma and rich red colour, Pimentón is made by grinding chilli peppers smoked over oak for periods as long as three to four weeks. Its sweet, smoky smell and flavour is an essential ingredient in a raft of dishes in Spanish cuisine, such as paella, and most notably in the making of chorizo. The degree of heat and spiciness is manipulated by the addition (or removal) of the pepper's own seeds to the grind.

Sunday, February 07, 2010

Mushrooms

I was visiting the mystery location of my blackberries, checking on their condition, when I came across these:


Created with flickr slideshow.

Where did they come from?

Saturday, December 26, 2009

Happy Hanukkah!


Meet Dan and Gwen. Dan is a local lad; Waipawa born and raised, he's the former owner of a ferocious looking beard, is very well travelled, and in the course of his journeys, met Gwen. Gwen is an American (from Seattle), Jewish and has seen more of this great planet than compatriot Sarah Palin is ever likely to. We were talking at work one day about December and Christmas, when she mentioned that the season for her is experienced a little differently than your average kiwi.

Sunday, December 06, 2009

Rhubarb & Custard...


...cocktail! I had a little rhubarb left over from the chutney, and still wanting to keep away from the usual things folk make with the red stuff, I thought a drink of some description would be worth a try. So after trawling through my cookbooks and asking the internet, I found this (apologies in advance for the non-metric measurements - I'll change them soon):

Rhubarb, Apricot & Ginger Chutney


At the bottom of your typical New Zealand backyard, just past Francesco the Jack Russell's grave and the smelly old compost pile, is an oft neglected plant found in many a New Zealand back yard: the rhubarb plant. It's a sturdy thing, requiring little in the way of attention; bearing a resemblance to silverbeet, it has long crimson stalks topped with full, leafy green, leaves. 

Friday, August 10, 2007

Purple Carrots

The Southland Times has a story about the rise in popularity of the purple carrot (link via Stuff). Carrots once came in a wide variety of colours, but changed over time to orange thanks to the influence of patriotic Dutch growers in the sixteenth century. Did you know there's a variety named after Jimi Hendrix called "Purple Haze"?! This article explains its origins and goes into detail about carrots and their intriguing history. Who'd of thought "carrots" and "intriguing" could share space in the same sentence...

Photo and article courtesy of Acorns - You and the World of Plants, a fantastic vegetable site with well written, indepth articles (not all about carrots, mind).

Sunday, June 24, 2007

Muttonbirds - Titi


Have you ever wanted to try a muttonbird but were too chicken (ah, comedy gold!) to give it a whirl? Take a look at this weeks effort in the kai lab.
First, some background. Muttonbirds, known also as the Sooty Shearwater or Titi amongst Maori, are a member of the petrel family. The origin of the name refers to the mutton-like taste of the flesh, and possibly the woolly appearance of its young. It is the chick that is harvested, found in vast numbers living in the multitude of burrows on the small islands
near Stewart Island (Rakiura). The season starts on the 1st of April and goes through to the 31st of May. All activity is administered by Rakiura Maori (Ngai Tahu) and their sustainable harvest programme. To that end, the bird population is monitored in conjunction with the University of Otago. The harvest is an age-old event for the islanders, being one of the few large-scale harvests of petrels in the world. Consequently, it is of immense significance, providing as it does income, an opportunity for families and those connected to meet, work and socialise together, as well as being an important facet of cultural life for Maori in the South Island.
The process: once the chicks are collected, they are plucked and then the feet and wings are cut off. They are then dipped in wax to help remove the layer of down on the bird's body. Once hardened, the wax is cracked and removed, taking the down with it. The birds are then packed in salt and placed in buckets for shipping to market on the mainland. The birds are expensive and available for a limited time. I bought mine from the Albert street market in Palmerston North; I've seen them for sale at fish markets, non-chain butcher shops and once at Pak 'n' Save in Hastings.


The bird is the size of a very small duck. It's fatty, a feature necessary for a bird soon to spend long periods of time at sea (except this one, obviously). Cooking them takes a wee bit of time. Your kitchen will also become quite pungent for a while. Personally, I don't mind the smell but some people might, so don't say I didn't warn you... I cooked mine with puha and I also made some gnocchi - more on those soon.

Find your puha, wash and put aside. Take your muttonbird and pluck off any downy feathers that may be left. Place in a pot of water - lots of water. Pop the lid on, bring to the boil and then simmer for an hour. Once the hour's up, drain off the water, and repeat the entire process. By the way, are your windows open? Go open them... Or turn your rangehood up to eleven.

Again, once that hour has been reached, drain off the water. As you can see from the photo, the bird possesses an astounding amount of fat, even after that initial change of water; the second change will take care of that though. This time, when refilling the pot with water, you'll only need enough to cover the bird.
Once the bird has simmered for about 30-40 minutes, whip up some gnocchi, dumplings or doughboys. During this time, hurl your puha into the pot with the muttonbird.
Time to cook the gnocchi. Remove the bird from the pot and keep warm - turn the heat up and drop your gnocchi into the pot to cook. While this is happening, remove the skin off the bird and don't play with the light settings on your camera, even if the results look good (deceptively so) on the camera's LCD screen...
Voila! Muttonbird, puha and misshapen gnocchi! It was very tasty - the meat of the bird is quite dark and does indeed taste like mutton. I've read grumbles about muttonbirds tasting overly greasy, salty and/or fishy - patently untrue. Changing the water minimises those potential problems, thus bringing out the flavour of the food as well as making it a bit healthier. If you make this for your family, you might want to remove the bones for your littlies. One bird would feed two people at a stretch, and given the cost (anywhere from $12 to $18 a bird), this is probably a truly seasonal treat (unless you 'know' people).

Other methods of cooking muttonbirds I've encountered involve grilling after boiling (reasonably common), boiling in milk (!) and an odd french story involving boiling in brandy (done presumably because they were French and can get away with that sort of nonsense).

Fancy something a little more flash? Try titi orzo by brilliant New Zealand chef Anne Thorpe.

Take a look at these two personal accounts of muttonbirding from Te Ara: The Encyclopedia of New Zealand and the National Library of New Zealand.

WILDFOOD #2: Wild Weeds - Nut Bars with Karengo Goodness!

Bron's theme for the second WILDFOOD event is 'Wild Weeds'. I was wandering around town, wracking my brain for an idea to submit, when suddenly I saw it before me - a kelp and nut health bar! Kelp = seaweed = wild weed! These beauties were sitting on the shelf of my local health food store, reeking of healthy, knit-your-own-muesli, sock-and-sandal goodness. I stopped and considered them for a while, thought about shoplifting them, remembered I was middle-class and then realised I might just be able to make them myself substituting the kelp with the big dried bag of karengo I have at home...

Karengo is a type of seaweed, a member of the porphyra family found on parts of the New Zealand coastline. Maori harvest it for eating - its health benefits are substantial: high in protein, selenium, iodine and a raft of other minerals and vitamins.

Powering up the laptop, I googled for a recipe and found this. It seemed simplicity itself - I had everything at home so it was off to the Kai Lab for some baking! I changed things a little using:


-1 cup of chopped macadamia nuts
-half a cup of sesame seeds
-half a cup of chopped peanuts
-handful of dried karengo fronds (you're going to end up with about 4 teaspoons worth of karengo powder)
-half a cup of maple syrup


First, into the blender went the karengo - let rip until it turns into a powdery dust (don't use a food processor - it's a little too big and the karengo will just bounce off the spinning blades).
Nuts. Hurl into the food processor with the karengo and blitz until blended. Add your maple syrup, mix thoroughly, remove and press into a greased baking pan. Bake for twenty minutes at 150 degrees celsius (preheat your oven).
Thirty minutes later (!), I sprint into the kitchen, remove the bars and after some judicious trimming of overly-brown bits, voila! A healthy wild weed-ish snack - very sweet and nutty, with just a hint of saltiness from the karengo. Nuts are a good source of protein, have a low GI and may even lower cholesterol. Karengo is unbelievably nutritious but is little known as a food source outside of the Maori community. The season for Karengo harvest in Hawke's Bay isn't too far away and I'll be doing a post on its gathering, as well as a recipe.
Fancy something a little more savoury? Try coriander pesto with karengo, courtesy of Maria Middlestead, NZ nutritionist.
A big thank you to Bron for letting me play:)

Friday, June 01, 2007

Hanging out for Hangi

Putting down a hangi can be a lengthy, labour intensive business. Done properly however, it can result in the most glorious outcome (just like sex, except dirtier). Imagine then, the effort required to feed 120 people! With the apple harvest at the orchard finally winding down after two long months, a hangi was put down as a way of saying 'thank you' to the staff for all their efforts. Thanks to the expertise of John and Fish, you'll see how it all took place, step by step.

Firstly, a definition. A hangi is a traditional Maori way of cooking food, done in a pit using heated stones and/or pieces of iron, with water or leafy vegetation thrown on to to produce steam. Wire baskets of food wrapped in foil and muslin are put on top of the hot stones and iron. The baskets are covered with wet sheets and then wet sacks. All this is then covered over with soil. The water in the sheets and sacks is turned into steam by the hot stones; with the steam trapped under the sacks and soil, the food begins to cook.
A lot of preparation is required for a hangi. Before you start, you'll need to find out the fire regulations for your area, so call your local council - during the summer for instance, fire bans are often in place. When choosing a site, two key factors to consider are wind direction and the proximity of buildings and vegetation. Finding yourself engaged in battling a rampaging bushfire alongside the emergency services while caught in the full glare of the nation's media is embarrasing but can be avoided as long as you plan ahead. Finally, you'll need ready access to water, for soaking the sheets and sacks you'll need later on, as well as for controlling the fire if the need arises.

So, what to cook? Typically, you'll find pork, beef, lamb, mutton and chicken in the hangi basket. Root vegetables such as potatoes and kumara (sweet potato) as well as others like pumpkin and carrot cook well in a hangi too. Steamed puddings and stuffing are are also well suited.In the days leading up to your hangi, you'll need to hunt down some special material. Look around for some metal baskets - old deep freezer baskets stripped of their plastic are ok - these will hold the food to be placed in the pit. It also protects it from the weight of soil that'll be piled on top, as well as allowing space for steam to circulate. Keep an eye out for at least five or six hessian sacks (make sure they haven't been used to hold chemical of any description) and put aside some old cotton bedsheets. A supply of muslin or mutton cloth for wrapping the food prior to placement in the baskets is essential (oven bags work just as well but muslin allows the hangi odour to permeate the food, as well as being inexpensive). An old tub or drum is useful for soaking the sheets and sacks. Find some heavy gloves which you'll need to protect your hands from the heat while shovelling embers. A large bag of watercress or cabbage leaves for placing on the stones once hot (they'll produce steam). Finally, make sure you have a good supply of firewood (enough for a couple of hours burn time), kindling and some newspaper.

Finding stones and iron may be tricky but once found, they'll serve you well for an unbelievably long time. The best stones to use are volcanic or igneous rock which, once white hot, retain their heat for a long time. Some of this rock finds it way into rivers and is identified by its 'glow' under the light of a full moon (!). Maori Food lists the types, locations and how to gauge the suitability of stones here (scroll down to " 3. Gear Check List : Stones". The section is part of a well written page on hangi - well worth a read). Pieces of iron, such as cut-up railway track, heat up quicker than stones but the heat dissipates rather quickly too. The number of stones needed depends on the size of your pit. As a very rough guide, you'll need enough to loosely cover the bottom of the pit.Where possible, try and prepare as much as you can the day before: cutting the firewood (cover the pile if it's to be left overnight to protect it from rain or overnight dew); digging the pit (cover this as well); soaking the sacks and sheets in water; preparing the meat and vegetables (with meat, make sure it is WELL THAWED); rounding up your stones and irons, spades, rakes, shovels and a hose or large water container.
Soaking the sacks overnight in water allows them to become thoroughly saturated. This is essential because it aids in generating steam as well as keeping the steam trapped inside the pit (not to mention keeping soil off the food). Do the same with the sheets - soaking provides water for steaming the food as well as preventing burning. Have them all soaking in your tub or drum near the hangi pit.

When digging your pit, use your baskets as a guide to the size you should dig your hole (keep in mind too that you may end up stacking your baskets). Place them on the ground, mark out the area around them, and when digging, make it a little bit bigger so you can tuck the sheets down the side. The hole should be big enough for the stones and over a third of the depth of your baskets.

Having dug the pit, fill the hole with newspaper and kindling. Layer your firewood on top in a latticed pyramid formation; bear in mind that you'll need sufficient fuel for the fire to be burnt down to embers within one and a half to two hours - enough time for the stones to become white hot (red hot for iron). This level of heat is required for the stones to be able to thoroughly cook the food, thus minimising the risk of illness from bacteria. Once the firewood is stacked, place the stones and iron on top of the wood. Again, if you're doing this the day before you fire up, cover it so as to protect the pit and firewood from surprise rainfall or overnight dew.

It should be mentioned at this point that many Maori heat their stones next to the pit, not in it as shown here. The reason why John prefers lighting the fire in the pit is that heated stones placed in a warm pit retain their heat more readily: heat is not being leeched from the stones by the surrounding cold earth. The principle is similar to that of a good barista serving hot coffee in a heated cup - it stays warmer longer. However, you must be careful to remove all of the embers and ash from the pit otherwise the food will taste overly smokey.

Time to light the fire. Ignite and allow to burn until all the wood is burnt to embers and ash in the pit (again, taking one and a half to two hours). Use the shovels to reposition any rocks that fall out of the fire. The rocks should be white hot (iron, red hot). Keep a close eye on your fire and make sure you have water handy. Replenish the fire as needed, and ensure the tub of wet sacks and sheets are nearby.

While the fire is burning, organise your food. Place food into mutton cloth or oven bags and place in baskets. The order of placement is important because everything will be cooking at the same time. Place the large dense meats such as mutton and pork on the bottom, fat side down, with chicken on top of that. Place your root vegetables on next with the stuffing and steamed puddings on top. Once you've gotten word that the stones are ready, round up some helpers and bring the baskets out to the hangi pit.Once the fire has burned down, don your gloves and use the shovels and rakes to scoop out any smoking embers and ash - only the stones and iron are to be left in the pit. This is hot work. Rake the removed material away from the pit and into a pile. Dowse with water. Spread the rocks out into an even layer.Once the pit has been cleaned, throw some water (a cup or so) on the stones - this will generate steam. Sometimes too much water can be used, resulting in rapid cooling. Placing watercress or cabbage leaves on the stones minimises that risk while generating the desired effect, the moisture being released from the leaves more slowly and steadily.
Moving quickly, place the baskets on the bed of stones and iron, large items first; stack anything smaller on top of this. Get the wet sheets and lay them over the baskets, draping the sides - ensure everything is well covered.Place the wet sacks on top of the sheets. Make sure they cover the sheets, but do not allow them to go down the sides of the baskets; they must lay on the top of the ground.Start shovelling soil on top of the sacks. Any areas where steam can be seen to be escaping must be covered with more earth: escaping steam means escaping heat. Ultimately, you'll end up with a small mound.

The cooking time depends on the number and size of rocks, the amount and
size of food baskets, as well as the size of the largest cuts of meat but generally speaking the cooking time will be three to four hours. It's quite difficult to overcook a Hangi as the longer it stays in the ground, the more the rocks cool. This stands in contrast to cooking in an oven where the temperature is kept at an even and constant rate.Time to uncover the food. Remove the soil from the sacks - steam rising from where you've dug is a good sign!Once uncovered, pull the sacks back off the sheets being very careful not to get dirt on them. Pull back the sheets (it will still be hot - keep those gloves handy), again being careful not to get soil on the baskets.Remove the baskets from the hangi pit and take them to the kitchen. When removing the meat, check the centre to ensure that it's cooked thoroughly. Serve and eat!The annual end of harvest hangi has been a feature of orchard life for the last three years - this was the best yet. Succulent pork (so enticing that people were snaffling samples as it came out of the pit!), moist chicken, fragrant bread stuffing, lightly smoked potatoes, sweet steamed pudding with enough cream to make a heart specialist swoon - brilliant! The evening ended with drinks, dancing (the table kind mostly) and an unscheduled bonfire. Children may have been conceived that night...


A twenty one gun salute to John, Fish, Di, Sarah, Doug and all their hangi helpers - the day was all the more special for their hard and tireless work.

And a huge thank you to Sarah, photo journalist and table dancer extraordinaire, for taking photos throughout the day (I had people to look after, pffft).

Click here to see Sarah's hangi photo set on Curious Kai's Flickr page - a whole days worth! Or click here to be taken straight to the Flickr slideshow of the hangi.

Keen on planning a hangi? The New Zealand Food Safety Authority has a great page on good food safety practice in preparing and cooking a hangi (also available as a downloadable PDF file).

Thursday, January 25, 2007

Rewena Bread - conclusion


Rewena Bread - Stage 3: Construction / Completion

NB. I've since added some suggestions which may improve the flavour of the bread - a big thanks to Mary from La Tavola.

With my mother installed as overseer and technical advisor, it was time to bake some bread - out came the ingredients:

1/2 litre of starter/bug (feed the remainder with sugar & water; otherwise pop in the fridge if you're not wanting to make more bread anytime soon)
4 tbspn sugar
5 cups flour

1 tspn salt

Combine dry ingredients and form a well, either in a bowl or on a clean surface. Pour bug into well and mix (yes, that's my mum - she started it and I eventually jumped in).


Eventually.


You may find you'll need to add water to the mixture if it appears too dry.

Time to knead the dough; more flour may be required to make it firmer. Kneading serves to further combine the ingredients, as well as distributing tiny air pockets evenly throughout the dough, thus strengthening its structure. Parallels were drawn between my kneading and that of an alsation playing the piano, so again my mother stepped in to show me how it's done (UPDATE - Mary suggested a couple of tips at this point: the dough should be a little sticky - too much flour when kneading can make it dry, as can too much kneading, which should be done for ten minutes at the most).


Cut (if necessary) and shape your dough. Place in a bowl, cover and leave to prove for a few hours in a warm place (such as the backseat of a 1985 Ford Laser parked in the sun UPDATE - er, this may be a tad too hot: if the proofing temperature is too high, not only will it drive off moisture, but temperatures above 35C stress the yeast - try your airing/hotwater cupboard instead). The dough will by now have almost doubled in size; knead again to remove any large air pockets that may have formed.


Bake at 200 Celsius in a greased loaf tin (which I don't have, hence the improv metal bowl-thingy) for 45-50 minutes. As the baking draws to a close, test the bread with a skewer or knock on the top of th
e loaf - if it sounds hollow, it's ready.


Well, it certainly looks impressive, but how did it taste? Bland. The last time I had rewena bread was a loaf I'd bought from the Albert St market in Palmerston North; it was firm and sweet. This, while big and bountiful, tasted a little dry and lacked the distinctive taste of that loaf, the subtle tang combined with its characteristic sweetness. I'm not entirely sure what went wrong - mum attributed it to the potatoes (I used new instead of floury(sp?) potatoes which are meant to be better), or some sort of glitch during fermentation. No matter - this was my first effort and now that I have a bug, I can try again and hopefully develop my rudimentary baking skills.

A big twenty-one gun salute to mummo for all her help and patience (bless!).

UPDATE - Mary also suggested using a little honey in the dough mixture; it retains moisture, limiting the likelyhood of the dough drying out while also imparting sweetness and flavour (depending on the type you use, say, Manuka).