Showing posts with label smoking. Show all posts

Thursday, February 11, 2010

From The Kai Lab: Smoked Paprika (Part 1)


It's a bit rough, and certainly not a patch on the real thing but pictured above is my tiny batch (two whole tablespoons!) of homemade smoked paprika!

Smoked paprika has its origins in Spain, where it's called Pimentón. Easily identified by its strong smoky aroma and rich red colour, Pimentón is made by grinding chilli peppers smoked over oak for periods as long as three to four weeks. Its sweet, smoky smell and flavour is an essential ingredient in a raft of dishes in Spanish cuisine, such as paella, and most notably in the making of chorizo. The degree of heat and spiciness is manipulated by the addition (or removal) of the pepper's own seeds to the grind.

Saturday, January 02, 2010

Eeling!


Nothing beats spending a warm, languid summer's evening down at the creek catching eels. Just remember that if you're wanting to create fond memories of the event, coat your legs in insect repellent before embarking on your expedition; acting as a mobile buffet for the local insect life may thrill them to bits, but it will sorely test your endurance. By the end of the evening, my legs resembled the ravaged neck of a horny teenager.

Tuesday, October 27, 2009

Backyard Tech: The Kerry 1000 Fish Smoker


Ladies and gentleman, I give you: a fish hot smoker made from an old, unloved oven
! It may not look like much, but read on...


While resembling a decommissioned prop off the set of Doctor Who, it is surprisingly effective in what it does. Kerry wanted a hot smoker that could accommodate a large catch. To achieve this, and to render it safe, all wiring and circuitry were removed, along with its housing; the resulting cavities were sealed with riveted metal sheets. The elements too were taken off, along with its casing.

The warmer drawer serves as the smoking chamber, with the smoke making its way into the body of the oven through a series of holes drilled through its floor.

Being a standard sized oven, it has four shelves and when full, there is plenty of room for the smoke to circulate and work its magic on the fish. The door seal is in surprisingly good condition given the oven's age, and no smoke escaped during operation.


And there you go! A dirt cheap fish smoker, made from something which would probably have ended up as landfill; backyard tech at its simplest.
Go make one!


All this and smokey trouty goodness too - huzzah! A big thank you to Kerry for his time and all round cleverness.

Sunday, December 02, 2007

From the Kai Lab: Cold Smoker


Nothing beats the sweet, smoky odour of food prepared on a smoker. While many New Zealanders own small smokers which hot smoke food, backyard cold smoking isn't nearly as widespread an activity. This is a shame as cold smoking allows greater control over the flavour of food being smoked. It can be time consuming but as is often the case, the end result makes it well worth while.

Cold smoking is the process of using smoke to cure and flavour foods without cooking them. In the past, this was done as a means of preserving fish and game for consumption during the leaner, less bountiful times of the year. The temperature range is between 12 to 25 degrees celsius, or room temperature, and the smoking time can take anywhere from a few hours to several days. To eliminate the risk of spoilage, the food can be cured, in the form of salting or brining, prior to smoking. Large setups allow for the smoking of chicken and game birds, fish and large cuts of meat. Cold smoking is ideal too, for flavouring small produce such as cheese, olives and salt.

To achieve the necessary low temperatures, the fire needs to be kept separate from the food being smoked. This is achieved by drawing the smoke from the heat source to the smoking chamber through piping or tubing, as seen in the technical diagram below.

With ideas cribbed from various books and websites, and with the help and expertise of Chocky, friend and backyard engineer, I set out to make my own mini cold smoker. Basically, it comprises two large stockpots; one sitting on an electric hotplate, connected to the other pot by a length of duct pipe. With the hotplate on, smoke from the smouldering sawdust is drawn into the other pot through a little battery-powered computer fan, with the heat dissipating as it makes its way across the divide - simple as that!
I was going to need:

  • 2 x 9 litre stockpots (mine were cheapies from the big red shed, a tenner apiece)
  • Duct pipe, 3 metres long, 100mm circumference (found at any hardware store; mine cost $25)
  • Computer fan (whipped from an old computer case; 12 volt)
  • Empty can, 100mm circumference (or as close as you can); also, it needs to be large enough to hold the fan (the fan was a tad bigger than the can, but you'll see what I did to get around that)
  • Electric hotplate
  • Grinder, jigsaw, drill, rasp and other assorted tools
  • 12 volt battery (a car battery)
  • Cable ties (pipe clips would be good but I couldn't find any for the duct pipe in a 100mm size)
  • Wire, to extend those already on the fan, about 1 metre in length
  • Clips, for the wire so it can connect to the battery
  • 2 wooden drawer handles
On to business: I drew an outline of the can on the bottom of one of the stockpots with a marker. I drilled a little hole for the jigsaw and began to cut my circle. When you're finished, use a rasp to file off any jagged edges and then wash the pot to remove filings and dust. This pot is our smoking chamber.

The empty can will stick out of the hole in the bottom of the pot - this is what the duct pipe will be attached to.


Chocky built a stand to hold the smoking chamber, using scraps lying around the workshop. We have a tripod, about a metre high with a supporting platform. The hole is to accomodate the can poking out of the smoking chamber.


Slits are cut in the top of the empty can and then flared to stop it from slipping through the hole in the bottom of the smoking chamber. It's hard to make out in the photo but the can holds the computer fan. It initially wouldn't fit, so I ground down the corners with my grinder. Don't take too much off; you want it to be absolutely snug inside the can. The fan will draw the smoke up through the duct pipe from the pot on the hotplate.


Place the smoking chamber over the hole in the platform. Pop the can into the hole in the smoking chamber, which in turn should be sitting over the hole in the platform. I was going to rivet the can to the pot, but I wanted to make the unit portable and easy to disassemble.


The fan's wires come out of the top of the can and lead out through a hole I drilled through the bottom of the pot.


With the smoking chamber sitting on the platform, add your extra length of wire and then the clips for the battery.


Take one end of the duct pipe and attach to the can with your cable tie or clip.


Now for the other pot - this will hold the sawdust and sits on the hotplate.
Cut a hole in the pot lid for the other end of the duct pipe. Make it slightly smaller than the diameter of the pipe - it will make for a snug and secure fit. File any rough edges, rinse the lid in water to get rid of dust and filings, then slowly twist the pipe into the hole. Now screw the two wooden drawer handles into the lid; wood is a poor conductor of heat, so no burnt fingers for you when it comes to removing the lid to add more sawdust.

As mentioned before, the smoke in this pot is generated by the smouldering sawdust, heated by the hotplate. As the heat rises, it carries the smoke up through the pipe. With three metres of pipe to traverse, the heat quickly dissipates so by the time it reaches the smoking chamber, the smoke is at room temperature.


Voila! One gleaming cold smoker, ready for action.


All I need now is to install some circular racks inside the smoking chamber to hold the food - a visit to some second hand stores and a garage sale or two should turn something up - old barbecue racks or similar should do the trick. Once that's done, it'll be time to give it a whirl - I'm thinking about re-visiting my previous bacon experiment and later, I'll smoke some peppers to make my own smoked paprika. I'll keep you posted...

A big, sabre-rattling "huzzah!" to Chocky for all his help (he practically built it all) - cheers, son!

Saturday, January 06, 2007

Filleting & smoking trout, or, how I earnt my man-badge this summer


Nothing says "I'm a man, despite my advanced knowledge of interior decorating" than catching, filleting and smoking trout. Paul, an avid, accomplished fisherman (and full-time man), gave me a trout in December. Having spent most of my life buying my fish pre-filleted and never having smoked one either, it seemed the perfect time to resurrect it from the freezer and to give vent to my inner hunter/gatherer (who, in a previous life, would have lived in a very well appointed cave).

Having thawed the trout, it was time to start. Paul had gutted it, leaving me with the descaling, removing the head and filleting. The first two actions were reasonably straight forward; the filleting posed more of a challenge. The aim was to remove the fillets from the rib cage and the backbone to create a butterfly fillet (you'll see what I mean soon). After wiping the trout down to prevent slippage, I began by placing the knife where the head was and running the knife between the rib cage and the flesh, with the tip of the blade moving along the backbone. Once you reach the tail, repeat this process on the other side.


Such skill! Witness the precision of the knife-wielder...

...and witness the true source of his power. Not having the foggiest idea of how to fillet fish, I found this (PDF file) on a website which took you through the process, gutting and filleting, step-by-step. It even had video clips you could stream or download demonstrating the actions. Having found it, the laptop was placed on the kitchen bench, close at hand, for assistance. For a beginner, the file was very helpful and I'm sure there are plenty of other resources, online or otherwise, that would be equally useful.

Once you have your two connected fillets (a butterfly fillet), you can remove the backbone, ribs and tail by simply pulling it off. Despite the clean-looking shot above, the bench looked like a crime scene. The first fillet (the bottom one in the photo) was relatively easy to remove; the other was damn awkward. My knife wasn't close enough to the rib cage and in the process of getting it back there, I kept leaving wee chunks of flesh behind - it looked very messy, certainly not the tidiest fillet in the world. If I ever come across you in a grievously wounded state, requiring immediate emergency field surgery, whether it's on the battlefield, a car crash or some industrial accident, take the knife off me and send me to fetch boiling water and towels - you won't regret it.Now to prepare the fillets. After separating them, put them aside and grab a bowl into which you'll put two tablespoons of salt and a cup of brown sugar. Mix thoroughly and then sprinkle liberally over the flesh side of your two fillets. Straight away, it'll start to absorbe the excess moisture of your fish. The mixture serves as a buffer to the smoke. Don't be concerned if it seems you have a lot of the salt and sugar mixture; the excess will run off.


Now cover your fillets and place in the fridge overnight.

One of three furry, four-legged seagulls that infest my kitchen.

And now for the final leg of this experiment : the smoking of the fillets. The reason why we're smoking in this instance is to improve the flavour of the trout. Smoking is also performed to cook, as well as preserve foods (this is a very useful Wikipedia link about smoking in all its forms - I never knew Lapsang souchong tea was smoked to give it its flavour!). You can smoke almost anything - fish, chicken and other white meat, red meat and even fruit (doesn't this sound exotic - I might give it a whirl during the apple harvest).
Here, I used manuka chips. Sprinkle one or two handfuls of chips over the base of the smoker - don't use anymore than this otherwise it imparts a bitter taste to the fish.
Pull your fillets out of the fridge a good hour or so before you start to cook. Pop the rack into the smoker and then place your fillets on top of that.


The burner section of the smoker has two little dishes for the methylated spirits. Pour enough so as to reach the halfway point, which provides fuel for around twelve to fifteen minutes (my time might be a little out - I am new to this).

Now at this point, I have to share a story with you. Millions of years ago when I was in the fifth form at high school, Miss Smith, my English teacher, shared a (somewhat apocryphal) story about a famous New Zealand writer. At the height of his alcoholism, and when money was tight, the gentleman would resort to drinking methylated spirits. To render it drinkable(ish), he would pour the meths through a couple of layers of burnt toast, filtering out the methanol and emetics which would ordinarily make you ill. I'm not sure how accurate this tale is, or if the chemistry is sound but it's an image that's stuck with me since I was 15 (that, and fragments of a poem he wrote about explosions and the beach - I can't for the life of me remember its name).

Light your meths.

Cleansing, purifying flame - cheers, Prometheus!


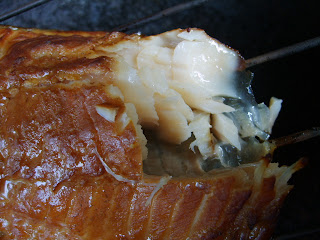
Pop the smoker on top of the burners, then take a peek through the little air holes just to make sure the flames haven't gone out. Make sure the lid is secure and then leave it. It takes around twelve to fifteen minutes for the meths to burn up. Once the fire is out (again, take a peek through the air holes), take the smoker off the burners and remove the lid. Your fillets should have a rich, golden-caramel colour to them.

The flesh should be white; if it's opaque, it's undercooked. It should also have a slight sheen to it.

You HAVE to click on this photo - it looks delectable!

How do they taste? Delicious! Very moist and succulent. Sweet, but not overly so and this is probably due to the tempering effect of the manuka smoke. Watch out for bones as you're eating.
Smoked trout always tastes good on slices of toasted bread with a squeeze of lemon.


A big fireworks-laden 'thank you' to Jen, Paul, Doug and Kerry for their help in this post.

UPDATES:

-Want to keep your hands fish smell-free? Clean them with a cut lemon or listen to my mum and rub them against the inside of your stainless steel kitchen sink (it's mentoned in the 'gutting fish' article I linked to earlier in this post - it works!)

-Don't have a smoker? Your barbecue will serve just as effectively, providing it has a firm lid or top of some description. Adapt the method shown accordingly

-A collection of recipes using smoked trout, courtesy of Cuisine magazine (scroll down past main article)

-From Kai Time (a magnificent show with the most mouth-watering food - watch it!): Smoked trout on spinach with freshwater koura (PDF file)

-Lucky last: line your smoker with foil before you scattter your sawdust - makes cleaning up afterwards that much easier (thank you, Ted)