
I love fruit cake. For me, nothing beats the simple pleasure of biting into a big slice of fruit cake, with a cup of tea, my slippers, and a copy of Alzheimer's Weekly (when they remember to send it), all within reach. The integral part of a good fruit cake is of course, the fruit - plump, rich sultanas, along with zesty, sweet mixed peel - but pride of place in that delicious cakey-crown must surely go to the glacé cherry.

While shop-bought glacé cherries certainly look nice, any claim to actually being a "cherry" is nominal. Processing the fruit starts with it being soaked in a preservative solution (containing E211 and E220*), before being placed in a sugar syrup augmented with glucose. The cherry's colour and flavour suffer during the process and so are supplemented with the addition of a red dye (E129), and both artificial and natural flavourings.
With all that going on, surely a home made one would taste better? How would it look? Like a seagull spotting a stray chip, or better yet a bit of cake, I spotted an opportunity and swooped in to seize it: I was going to make glacé cherries.

But first, some homework. I had a handy book from Bronwyn which had a section on preserving fruit which would have served well if it wasn't for the fact that I'd lost it. I ransacked my library and found instead a recipe in James Martin's "Desserts" which involved steeping the cherries over a six day period in syrup - I decided to use that (incidentally, his "Great British Winter" book has an awesome recipe for christmas cake, which I intend using these cherries in). While I now had a recipe, I needed to understand why it worked the way it did. After a little digging, M. Shafiur Rahman's "Handbook on Food Preservation" offered an explanation.
Glacé cherries are obviously cherries preserved for use when they're out of season. The water content of the fruit poses a problem, because it provides conditions ideal for bacteria to thrive in, so clearly it needs to be removed. How is this done? By steeping the cherries in sugar syrup. This causes water to pass from the fruit into the syrup through osmotic pressure; applying heat to the syrup hastens the process. Afterwards, the fruit is air-dried to remove any remaining water. Done slowly over time, the process allows the fruit to maintain its plumpness, as well as most of its colour and flavour, although there is a marked increase in sweetness.

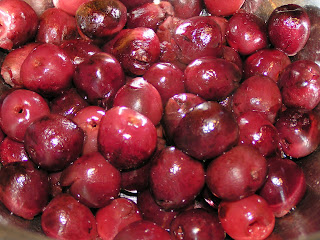
Time to get started. I bought 500g of American cherries which I'd found at the supermarket - just pick the nice ones - and weighed up 200g of sugar. Rinse your fruit, then remove the stones (I used an olive pitter). Pop your cherries into a pot and add just enough water to cover them.

Bring to the boil, reduce the heat and simmer until the cherries have softened but still retain some firmness. Add your sugar, stir until dissolved, then remove from the heat.

Pour the cherries and syrup into a container, then arrange into a single layer.
As you can see, there is some colour loss but this will change as it begins to steep in the syrup. Cover and leave for 24 hours.

The next day, drain the syrup from the fruit and measure into a pot. Add 30g of sugar for each 300ml of syrup and bring to the boil, again stirring to dissolve the sugar.

Pour over the fruit, cover and leave for 24 hours. Repeat this step two more times, increasing the sugar to 40g per 300ml of syrup.

By now, the fruit had changed to a blackberry-purple type colour, markedly different in appearance from the washed-out red I started with. While there was some reduction in size, the fruit was surprisingly firm; the syrup was almost as thick as double cream.

Day five: drain the syrup from the fruit, measure, then pour the syrup into a large pot (it will foam up) and add 20g of sugar for each 50ml of syrup; at this stage I had 450ml of liquid, so I added 180g. Bring to the boil, stirring to dissolve the sugar. Add the cherries and boil for 2 minutes. Return to your container and leave for 12 hours. Then repeat this step. The syrup will have the consistency of honey or treacle.

Drain off the syrup and place the cherries on a cake rack to dry, placing it over a sheet of baking paper. Once dry, store in an airtight container with the fruit sandwiched between two sheets of greaseproof paper, ready for use.
Voila! Home made glacé cherries - dark, sweet and more tantalising than a bought packet! They still have most of their cherry flavour and despite being plump, they're not particularly juicy, which is good, otherwise it could result in a soggy cake. Don't they look good!
Linky Goodness:
- "Osmotic Dehydration of Foods" from M. Shafiur Rahman's "Handbook of Food Preservation" (via Google Books) clickety
- *Curious about the little letters and numbers (E211, E129, etc) that appear on the ingredients list of your grocery items? (via t'wiki) clickety
- "Cherry" by Ratatat: clickety
Update 21/12/10:
There's mould starting to grow on the cherries! Despite being kept in a cool, dark place, it would seem that these sugar-drenched treats aren't beyond the reach of our tiny fungal-friends. Based on the time this project was started, the cherries are good for around 5-6 months.


15 comments:
Oh Lordy that makes me want Cherries so badly! Damn they look delish!
Yes they look good, I am more of a cherry person than a glace' ginger person... :-)
hi nigel !
nicely done and with coffe must be wonderful !!
salut de Paris Pierre
Some great photos in this post, particularly the one with the cherries on the rack. Your photos make your case for home made glacé cherries that much stronger!
Nicole - Yeah, it's a pity we won't see them until summer, which is why when I saw them, it seemed too good an opportunity to pass up. Roll on summer & all its bounty!
Alessandra - I have to agree - they're so much more succulent.
Anon - Thank you! I've spent quite a bit of time learning how to use my little camera, simply by taking it off "auto" mode & tinkering with the settings & lighting. Looking at the photos in my old posts & comparing them with the ones from the last 6 or so months, they seem to look a little better.
Pierre - Pot pourri! Thank you, young man - it's always a pleaure to hear from you!
I've lost your email or I'd send you the book again. My cherries (from Central Otago Stellas I pitted and froze in January) are here:
http://bronwyncarlisle.blogspot.com/2010/07/chocolate-cherries.html
Cheers, Bronwyn - I'll be in touch soon.
Hey Nigel they look fab! I also love to preserve my cherries in vodka!
Good idea, Allie
I'm glad you've posted this. I always thought I hated cherries as a child, but really I think I just didn't like the E numbers!
These sound delicious though, and could definitely change my mind about glace cherries...
I'm curious, any idea how long they will keep once in glacé state?
Kat - the e-number list makes for intriguing reading. They're not all bad & in most regards are somewhat essential. While the cherries look good, they eventually start to look a little drab, but still taste good. In terms of appearance, aesthetics, there's no way mine can compete with the commercial stuff.
Lisa - For quite a while I hope. I really don't know, so I'll keep tabs & post the minute they start to degrade. I'm guessing at least six months, which is no where as long as commercial product, but of course they have the advantage of having a chemical preservative.
You know, I can't look at that first photo without this fleeting twinge occurring in my loins...
hi nigel
i have to ask your not 'the' nigel olsen
gary
ps love the self glacing technique
Gary - Elton John's drummer? Shhh, don't tell anyone...
Post a Comment